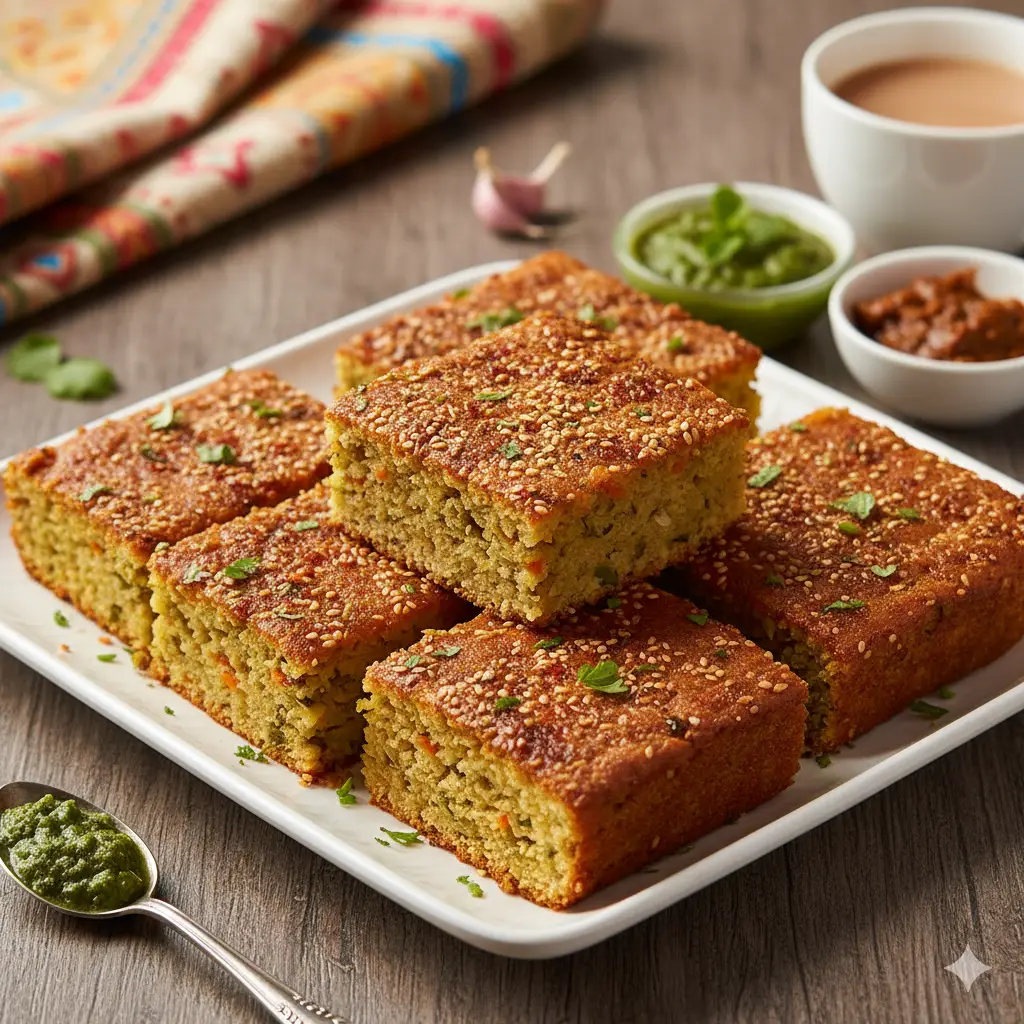
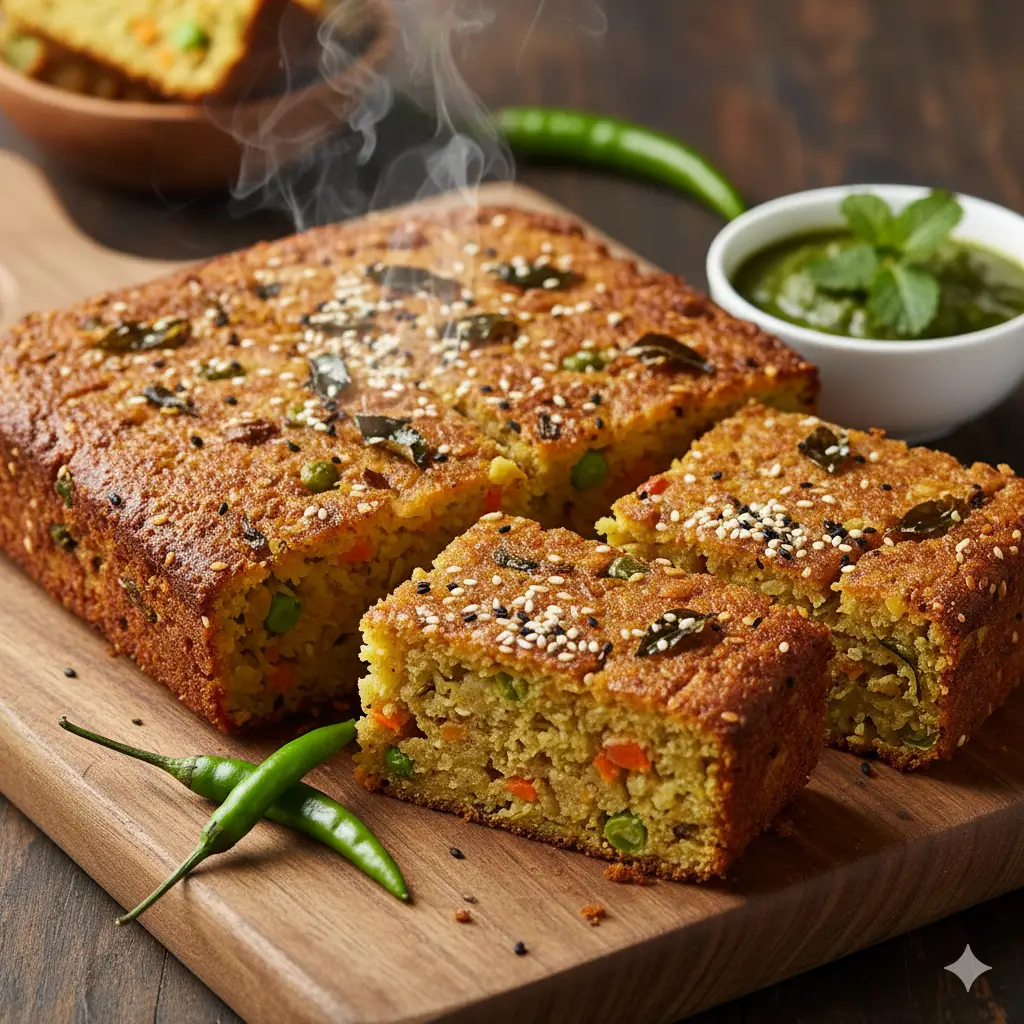
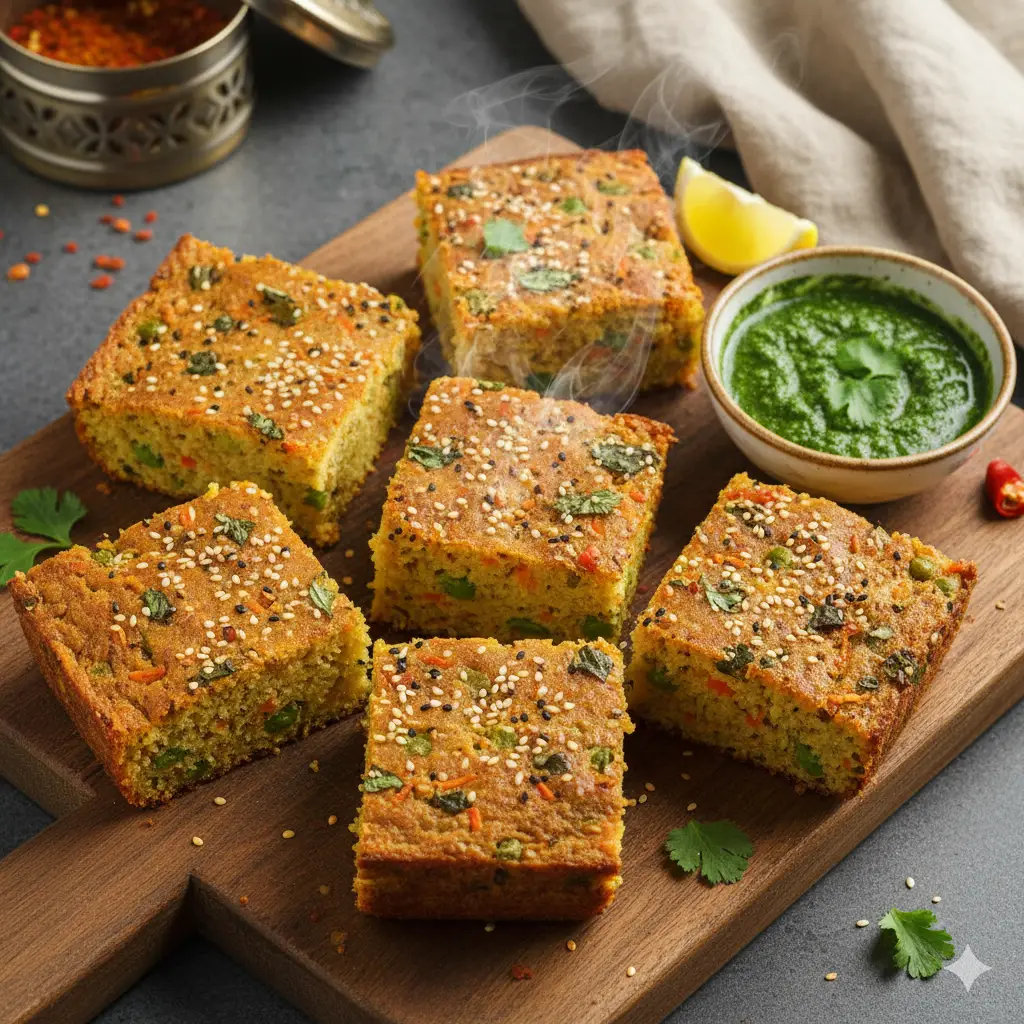
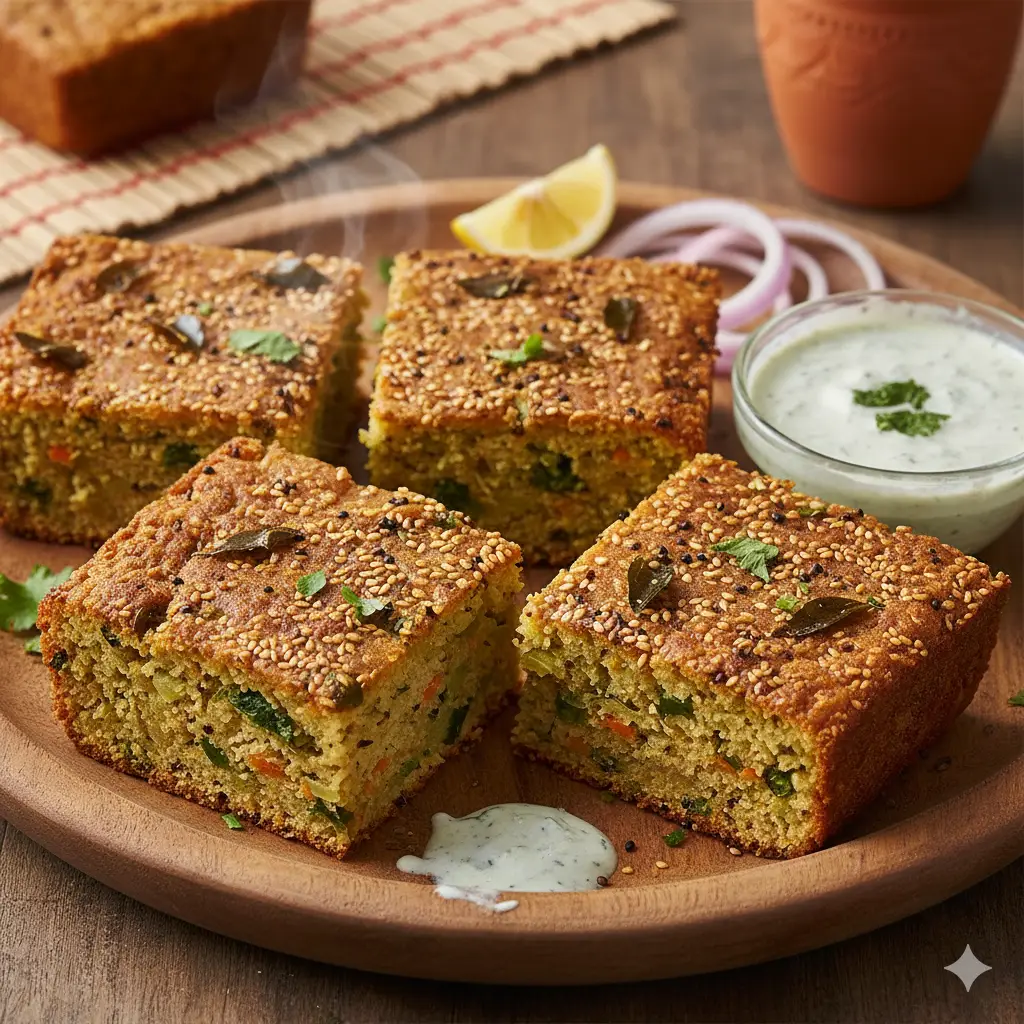
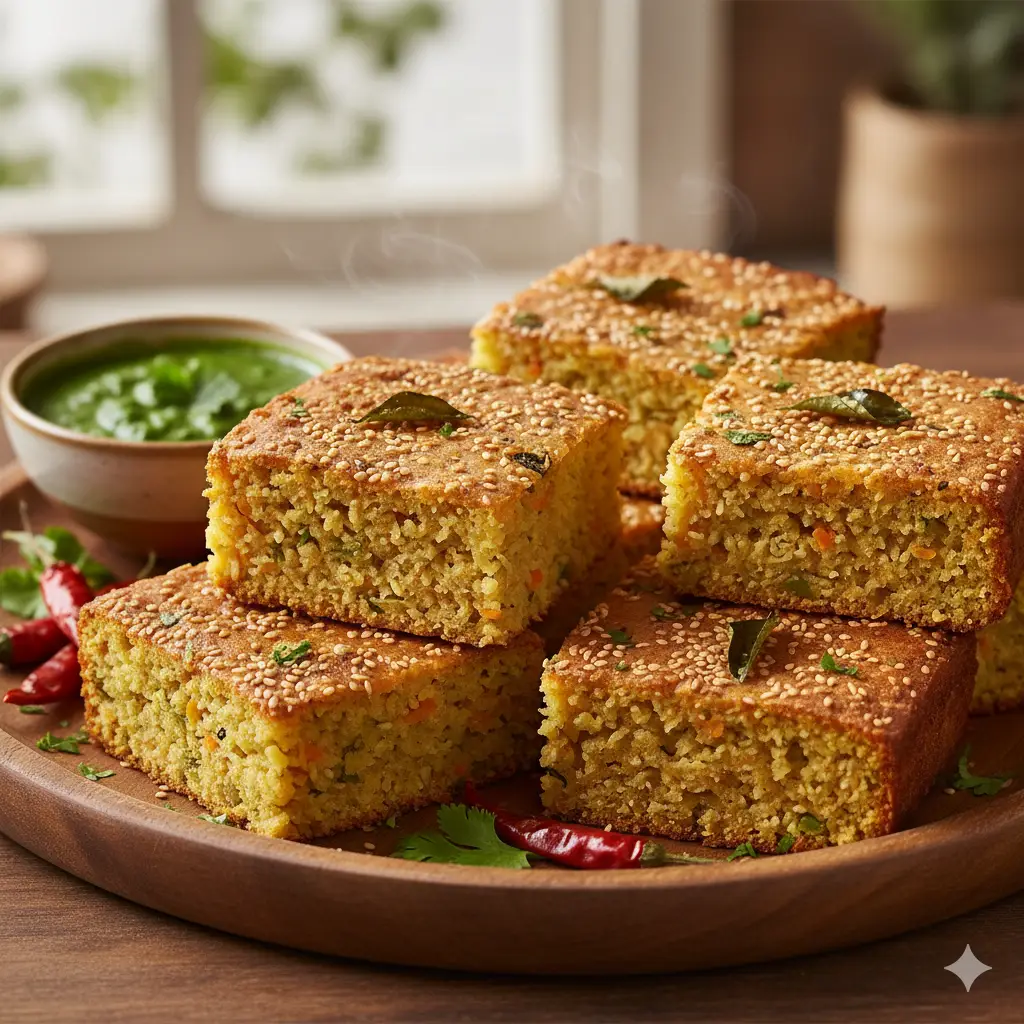
Handvo ## Handvo (Gujarati Savory Lentil & Rice Cake) ### Description Handvo is a traditional Gujarati savory cake made from a fermented batter of rice and mixed lentils, flavored with spices and vegetables, and cooked until crisp outside and soft inside. It is nutritious, filling, and commonly enjoyed with chutney or curd. --- ## Ingredients ### For Handvo Batter * 1 cup rice (regular or idli rice) * ½ cup toor dal (split pigeon peas) * ¼ cup chana dal (split Bengal gram) * ¼ cup urad dal (split black gram) * ¼ cup moong dal (split green gram) * 1 cup sour curd (yogurt) * ½ to ¾ cup water (as needed) * 1 tablespoon ginger-green chili paste * 1 teaspoon turmeric powder * 1 teaspoon red chili powder (adjust to taste) * 1 teaspoon coriander powder * 1 teaspoon cumin powder * Salt to taste * 1 teaspoon sugar (optional, for balance) * 1 tablespoon lemon juice (optional) ### Vegetables (Finely Chopped or Grated) * 1 cup bottle gourd (lauki/dudhi) * ½ cup carrot * ¼ cup capsicum (optional) * 2 tablespoons fresh coriander leaves ### For Tempering (Tadka) * 2 tablespoons oil * 1 teaspoon mustard seeds * 1 teaspoon sesame seeds * 1 pinch asafoetida (hing) * 8–10 curry leaves ### For Cooking * 1 tablespoon fruit salt (Eno) or 1 teaspoon baking soda * Oil for greasing and drizzling --- ## Instructions ### Step 1: Soaking 1. Wash rice and all lentils together thoroughly. 2. Soak them in enough water for **6–8 hours** or overnight. ### Step 2: Grinding & Fermentation 1. Drain the soaked rice and lentils. 2. Grind into a **slightly coarse batter** using minimal water. 3. Transfer batter to a large bowl. 4. Add sour curd and mix well. 5. Cover and allow to ferment for **8–12 hours** in a warm place until slightly bubbly and tangy. ### Step 3: Preparing the Batter 1. Add salt, turmeric, red chili powder, coriander powder, cumin powder, sugar, ginger-chili paste, and lemon juice. 2. Mix well. 3. Add grated vegetables and chopped coriander. 4. Adjust batter consistency — it should be thick but pourable. ### Step 4: Tempering 1. Heat oil in a small pan. 2. Add mustard seeds; let them crackle. 3. Add sesame seeds, hing, curry leaves. 4. Pour this tempering into the batter and mix gently. ### Step 5: Cooking Handvo (Pan Method) 1. Heat a thick-bottomed pan or kadhai and grease it well. 2. Add fruit salt (Eno) to the batter and mix gently. 3. Immediately pour batter into the pan and spread evenly. 4. Drizzle oil around the edges. 5. Cover and cook on **low flame for 15–20 minutes**. 6. Once bottom turns golden and crisp, flip carefully. 7. Cook uncovered for another **10–12 minutes** until cooked through. *(Alternatively, Handvo can be baked at 180°C for 35–40 minutes.)* ### Step 6: Serving 1. Remove from heat and let it rest for 5 minutes. 2. Cut into wedges. 3. Serve hot with green chutney, garlic chutney, or curd. --- ## Food Categories Gujarati Cuisine, Indian Snack, Savory Cake, Fermented Food, Vegetarian Dish, Traditional Indian Food --- ## Meal Category (Time of Eating) Breakfast, Brunch, Evening Snack, Light Dinner --- ## Meal Type Vegetarian, High-Protein, Wholesome Meal, Fermented Meal --- Read full recipe
Butter Cookies Recipe (Whole Wheat Butter Biscuits) ## Butter Cookies Recipe (Whole Wheat Butter Biscuits) ### Description These Whole Wheat Butter Biscuits are crisp on the edges, slightly soft inside, and rich with buttery flavor. Made with whole wheat flour, they are a healthier alternative to classic butter cookies while still being perfect for tea-time, festive occasions, or light snacking. --- ## Ingredients * Whole Wheat Flour (Atta) – 1 cup * Unsalted Butter (softened, at room temperature) – ½ cup (100–110 g) * Powdered Sugar – ½ cup * Milk – 2 to 3 tablespoons (as needed) * Vanilla Essence – 1 teaspoon * Baking Powder – ½ teaspoon * Salt – a pinch --- ## Instructions ### Step 1: Prepare the Dough 1. In a large mixing bowl, add the softened butter and powdered sugar. 2. Cream the butter and sugar together using a whisk or spatula until the mixture becomes light, smooth, and fluffy. 3. Add vanilla essence and mix well. ### Step 2: Mix Dry Ingredients 4. In a separate bowl, sift together whole wheat flour, baking powder, and salt. 5. Gradually add the dry ingredients to the butter mixture. ### Step 3: Form the Dough 6. Add milk little by little and gently mix to form a soft, smooth dough. * Do not knead too much; just bring the dough together. 7. Cover the dough and refrigerate for 15–20 minutes for better shaping. ### Step 4: Shape the Cookies 8. Preheat the oven to **180°C (350°F)** for 10 minutes. 9. Line a baking tray with parchment paper or grease it lightly. 10. Roll the dough into small balls, place them on the tray, and gently flatten using a fork or your fingers. * You can also roll the dough and cut it using cookie cutters. ### Step 5: Bake 11. Bake in the preheated oven for **12–15 minutes** or until the edges turn light golden. 12. Do not overbake; the cookies will firm up as they cool. ### Step 6: Cool and Store 13. Remove from the oven and let the cookies cool completely on a wire rack. 14. Store in an airtight container once cooled. --- ## Serving Suggestions * Serve with tea, coffee, or warm milk * Ideal for kids’ snacks and festive gifting --- ## Tips & Variations * You can add chopped nuts, chocolate chips, or cardamom powder for flavor variation. * For a slightly crisper texture, bake for an extra 2 minutes. * Replace powdered sugar with jaggery powder for a more rustic taste. --- ## Food Categories Cookies, Biscuits, Baked Goods, Vegetarian Snack, Tea-Time Snack, Eggless Desserts --- ## Best Time to Eat (Category) Breakfast, Evening Snack, Tea Time, Dessert --- ## Meal Type Snack / Dessert --- Read full recipe
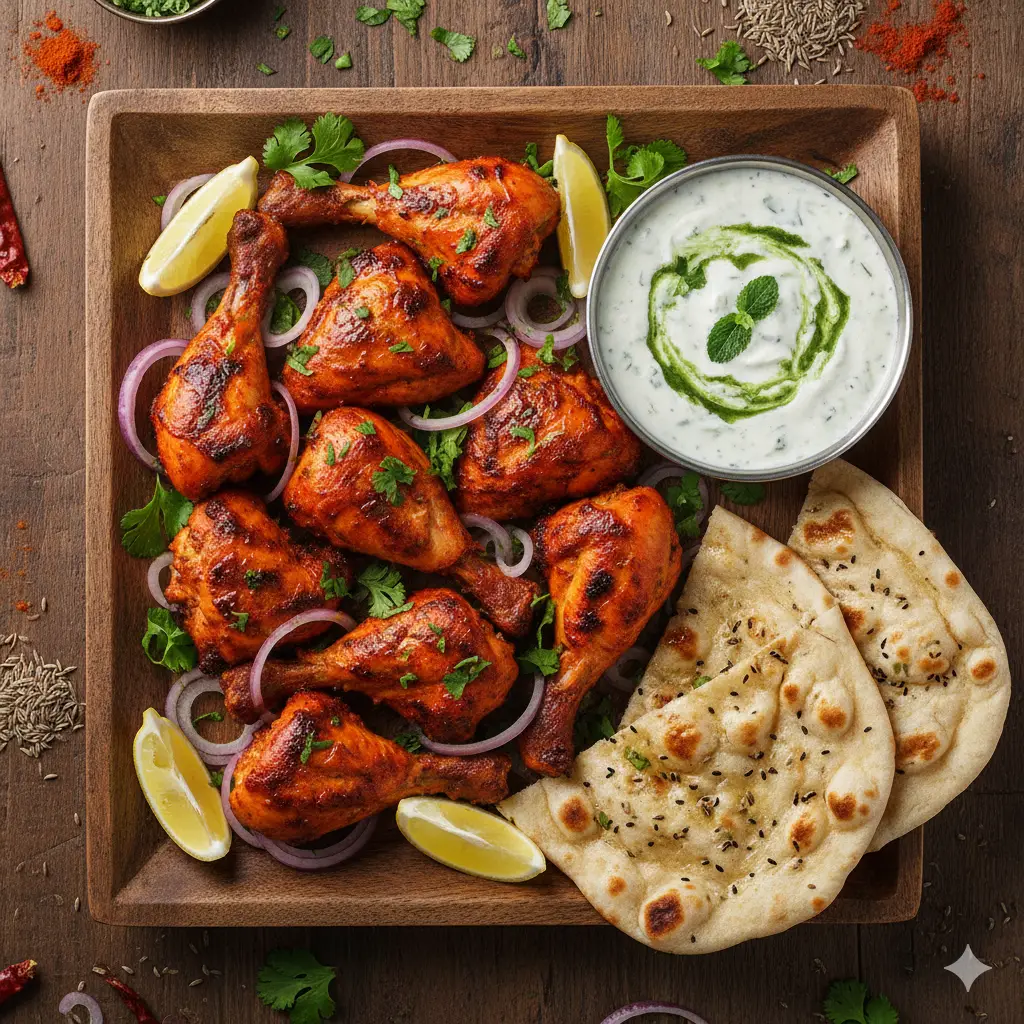
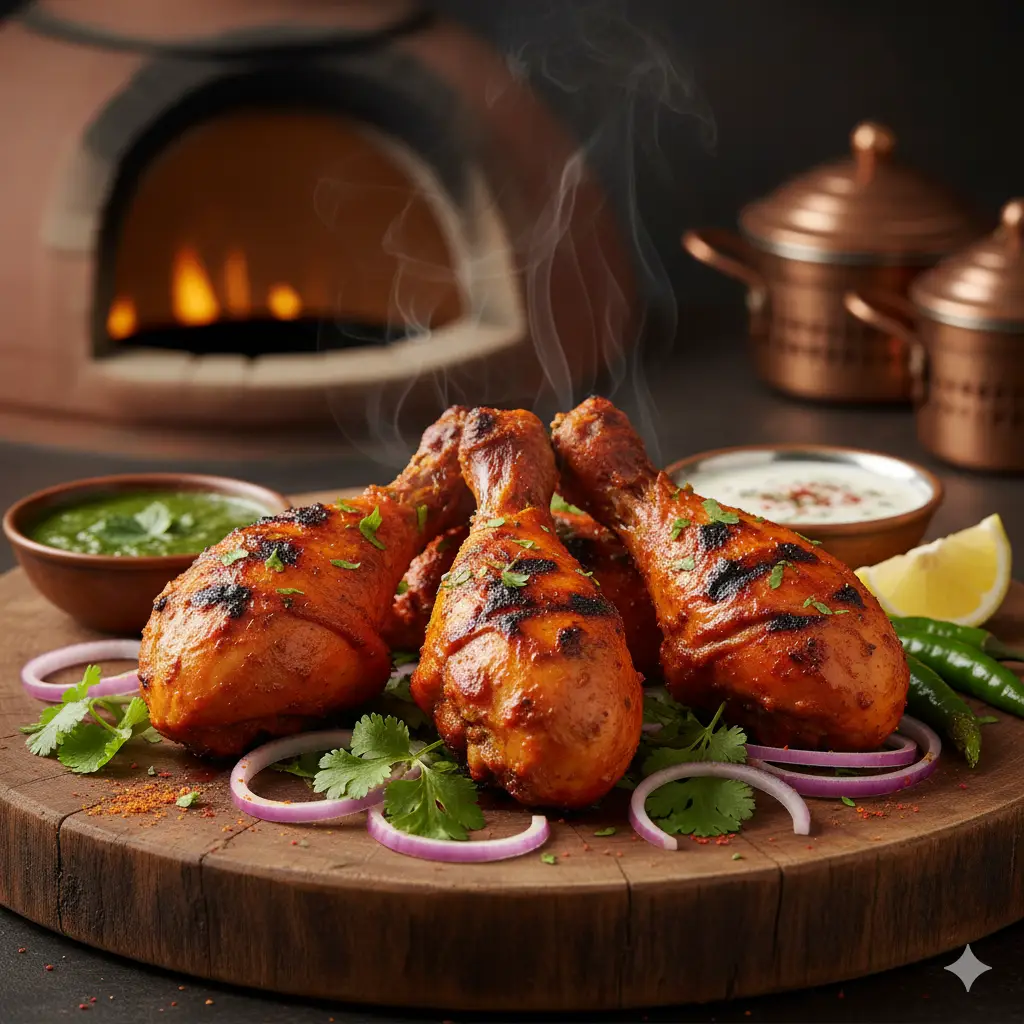
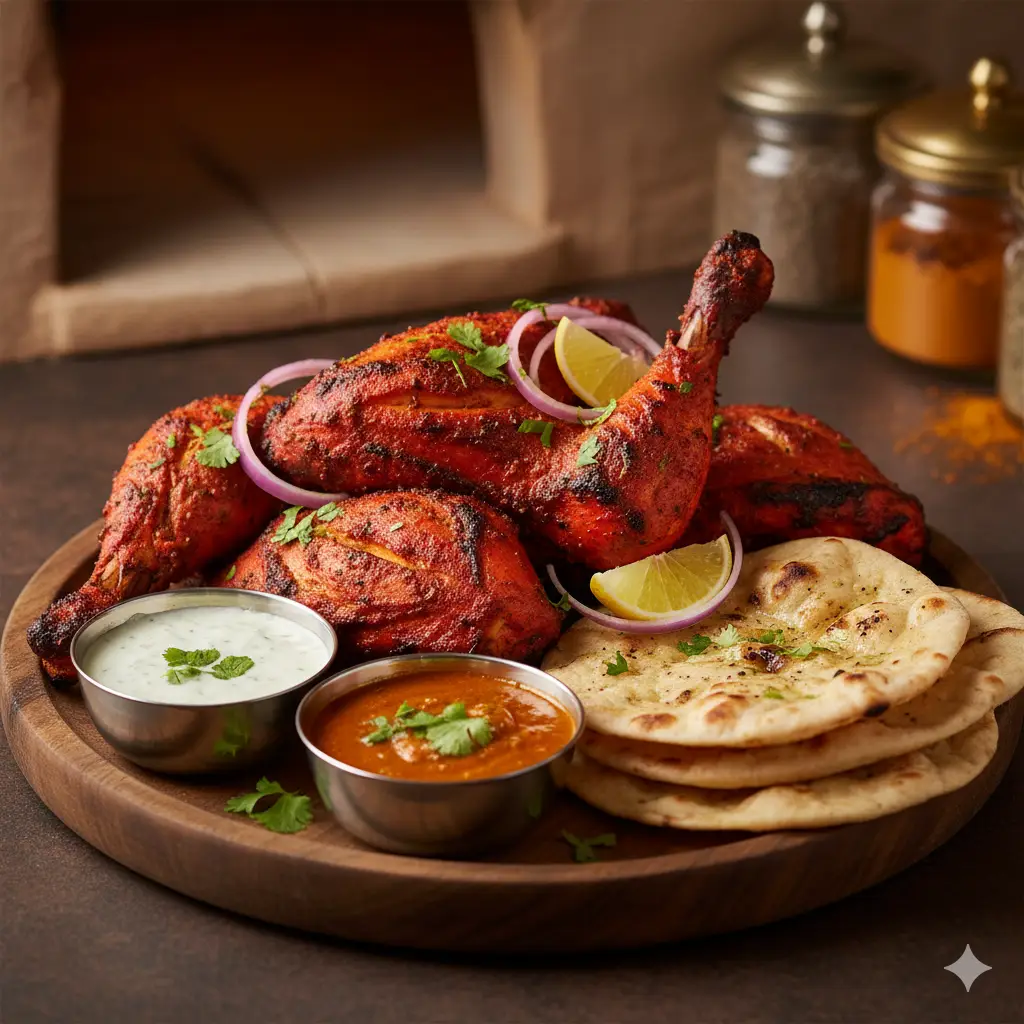
Chicken Tandoori ## Chicken Tandoori Recipe ### Description Chicken Tandoori is a classic Indian dish made by marinating chicken in spiced yogurt and cooking it at high heat, traditionally in a tandoor (clay oven). It is known for its smoky flavor, vibrant color, and tender, juicy texture. --- ## Ingredients ### For the Chicken * 1 kg chicken (whole chicken cut into pieces or chicken leg quarters) * 2 tablespoons lemon juice * Salt to taste ### For the Marinade * 1 cup thick plain yogurt (hung curd preferred) * 2 tablespoons ginger-garlic paste * 2 tablespoons tandoori masala * 1 teaspoon red chili powder (adjust to taste) * 1 teaspoon Kashmiri red chili powder (for color) * 1 teaspoon turmeric powder * 1 teaspoon cumin powder * 1 teaspoon coriander powder * 1 teaspoon garam masala * 1 tablespoon mustard oil (or any cooking oil) * 1 tablespoon gram flour (besan), optional (helps binding and flavor) * Salt to taste ### For Cooking * 1–2 tablespoons oil or butter (for brushing) * Chaat masala (for garnish) * Lemon wedges (for serving) * Onion rings (optional) --- ## Instructions ### Step 1: Prepare the Chicken 1. Wash the chicken thoroughly and pat dry. 2. Make deep cuts on the chicken pieces using a sharp knife. This helps the marinade penetrate well. 3. Rub the chicken with lemon juice and salt. 4. Let it rest for 15–20 minutes. ### Step 2: Prepare the Marinade 1. In a large mixing bowl, add yogurt and whisk until smooth. 2. Add ginger-garlic paste, tandoori masala, red chili powder, Kashmiri chili powder, turmeric, cumin powder, coriander powder, garam masala, mustard oil, gram flour (if using), and salt. 3. Mix everything well to form a thick, smooth marinade. ### Step 3: Marinate the Chicken 1. Add the chicken pieces to the marinade. 2. Coat each piece thoroughly, ensuring the marinade gets into the cuts. 3. Cover and refrigerate for at least 6–8 hours. For best results, marinate overnight. ### Step 4: Cooking Method Options #### Oven Method 1. Preheat the oven to 220°C (430°F). 2. Place the marinated chicken on a wire rack over a baking tray. 3. Brush lightly with oil or butter. 4. Bake for 25–30 minutes, turning once halfway. 5. Broil or grill for the last 5 minutes to get a charred effect. #### Pan or Tawa Method 1. Heat a heavy pan or grill pan on medium heat. 2. Add a small amount of oil. 3. Cook the chicken pieces, turning occasionally, until fully cooked and slightly charred on all sides. #### Air Fryer Method 1. Preheat air fryer to 180°C (360°F). 2. Arrange chicken in a single layer. 3. Cook for 18–22 minutes, flipping halfway. ### Step 5: Final Touch 1. Sprinkle chaat masala on top. 2. Garnish with onion rings and lemon wedges. 3. Serve hot. --- ## Food Categories Indian, North Indian, Mughlai, Grilled, Barbecue, Non-Vegetarian, Spicy --- ## Meal Category Lunch, Dinner, Party Food, Appetizer --- ## Meal Type Main Course, Starter --- Read full recipe
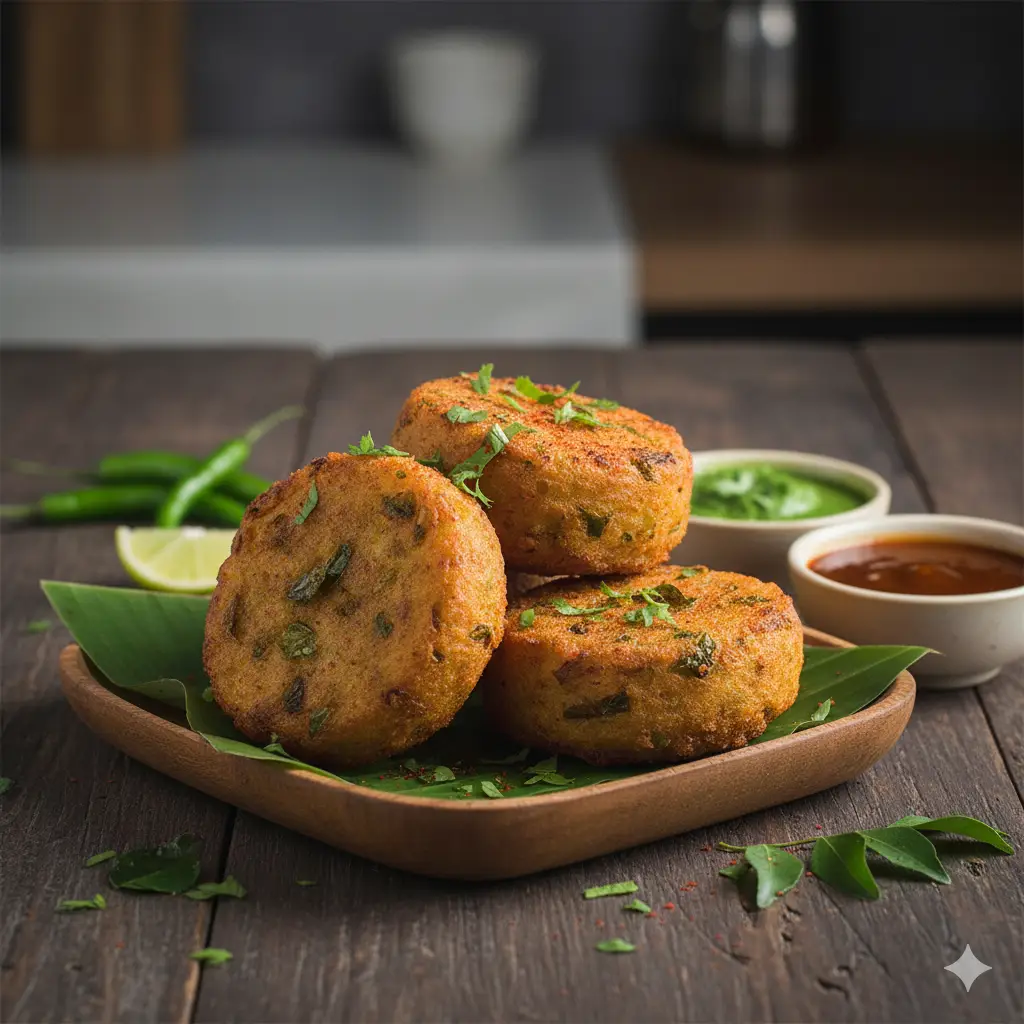
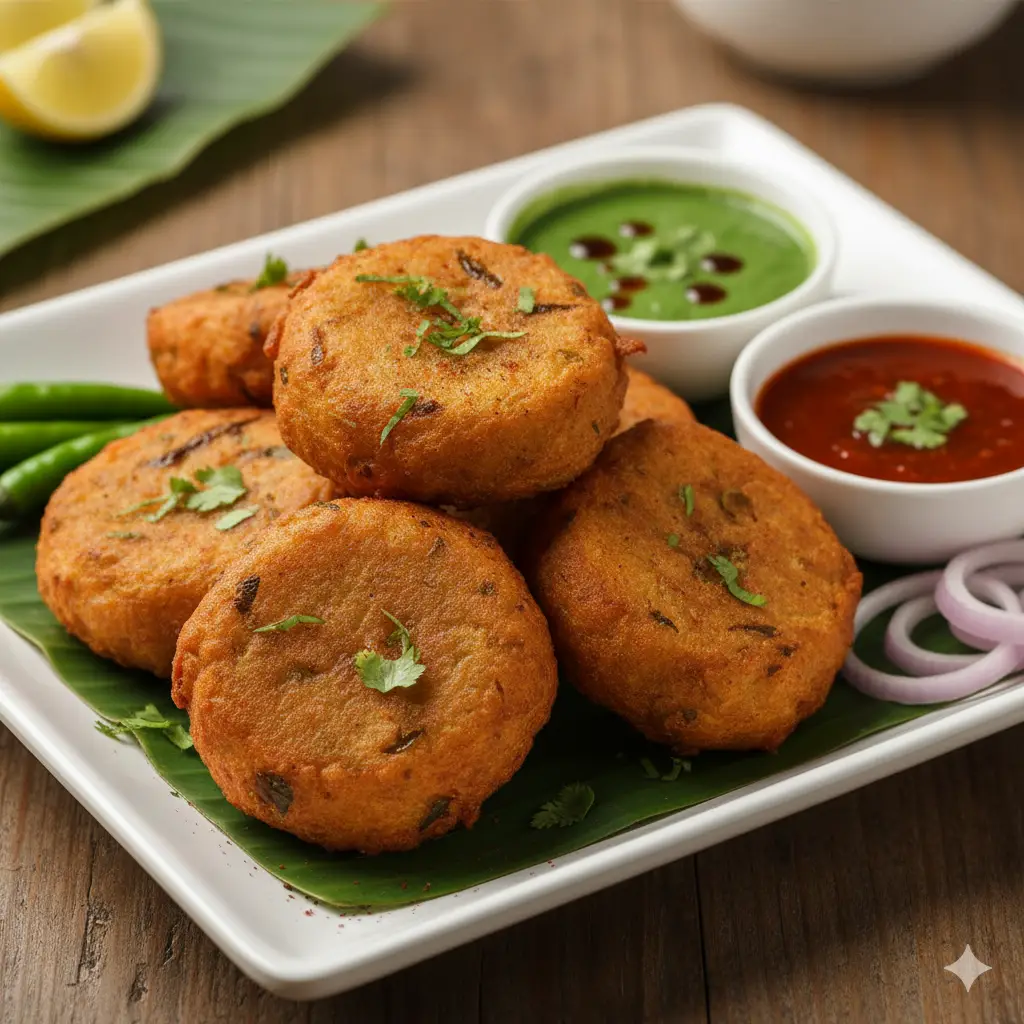
Batata vada ## Batata Vada Recipe ### Description Batata Vada is a popular Maharashtrian street food made with a spiced potato filling, shaped into balls, coated with gram flour (besan) batter, and deep-fried until golden and crispy. It is commonly served hot with green chutney, garlic chutney, or inside a pav (bread roll) as *Vada Pav*. --- ## Ingredients ### For the Potato Filling * Potatoes – 4 large (boiled, peeled, and mashed) * Green chilies – 2 (finely chopped) * Ginger – 1 inch (finely chopped or grated) * Garlic – 3 cloves (crushed) * Mustard seeds – 1 teaspoon * Cumin seeds – ½ teaspoon * Asafoetida (hing) – a pinch * Turmeric powder – ½ teaspoon * Curry leaves – 8 to 10 (finely chopped) * Fresh coriander leaves – 2 tablespoons (chopped) * Lemon juice – 1 tablespoon * Salt – to taste * Oil – 2 teaspoons (for tempering) --- ### For the Gram Flour Batter * Gram flour (besan) – 1 cup * Turmeric powder – ¼ teaspoon * Red chili powder – ½ teaspoon * Salt – to taste * Baking soda – a pinch (optional) * Water – as needed (to make a thick, smooth batter) --- ### For Frying * Oil – enough for deep frying --- ## Instructions ### Step 1: Prepare the Potato Filling 1. Heat 2 teaspoons of oil in a pan. 2. Add mustard seeds and let them crackle. 3. Add cumin seeds, asafoetida, curry leaves, ginger, garlic, and green chilies. Sauté for 30–40 seconds until aromatic. 4. Add turmeric powder and mix well. 5. Add the mashed potatoes and salt. Mix thoroughly so the spices are evenly distributed. 6. Cook for 2–3 minutes on low heat. 7. Turn off the heat, add lemon juice and chopped coriander leaves, and mix well. 8. Allow the mixture to cool slightly. 9. Divide the mixture into equal portions and shape them into round balls. Set aside. --- ### Step 2: Prepare the Batter 1. In a mixing bowl, add gram flour, turmeric powder, red chili powder, salt, and baking soda (if using). 2. Gradually add water while whisking to form a thick, smooth batter without lumps. 3. The batter should be thick enough to coat the potato balls evenly. --- ### Step 3: Fry the Batata Vadas 1. Heat oil in a deep frying pan on medium heat. 2. Dip each potato ball into the batter, ensuring it is fully coated. 3. Carefully drop the coated balls into the hot oil. 4. Fry in batches, turning occasionally, until they are golden brown and crisp on all sides. 5. Remove with a slotted spoon and drain excess oil on paper towels. --- ## Serving Suggestions * Serve hot with green chutney, tamarind chutney, or dry garlic chutney. * Can be served inside pav (bread roll) to make **Vada Pav**. * Best enjoyed fresh and crispy. --- ## Food Categories Indian Snack, Maharashtrian Cuisine, Street Food, Vegetarian, Fried Food --- ## Suitable Meal Time Breakfast, Evening Snack, Light Lunch --- ## Meal Type Snack --- Read full recipe
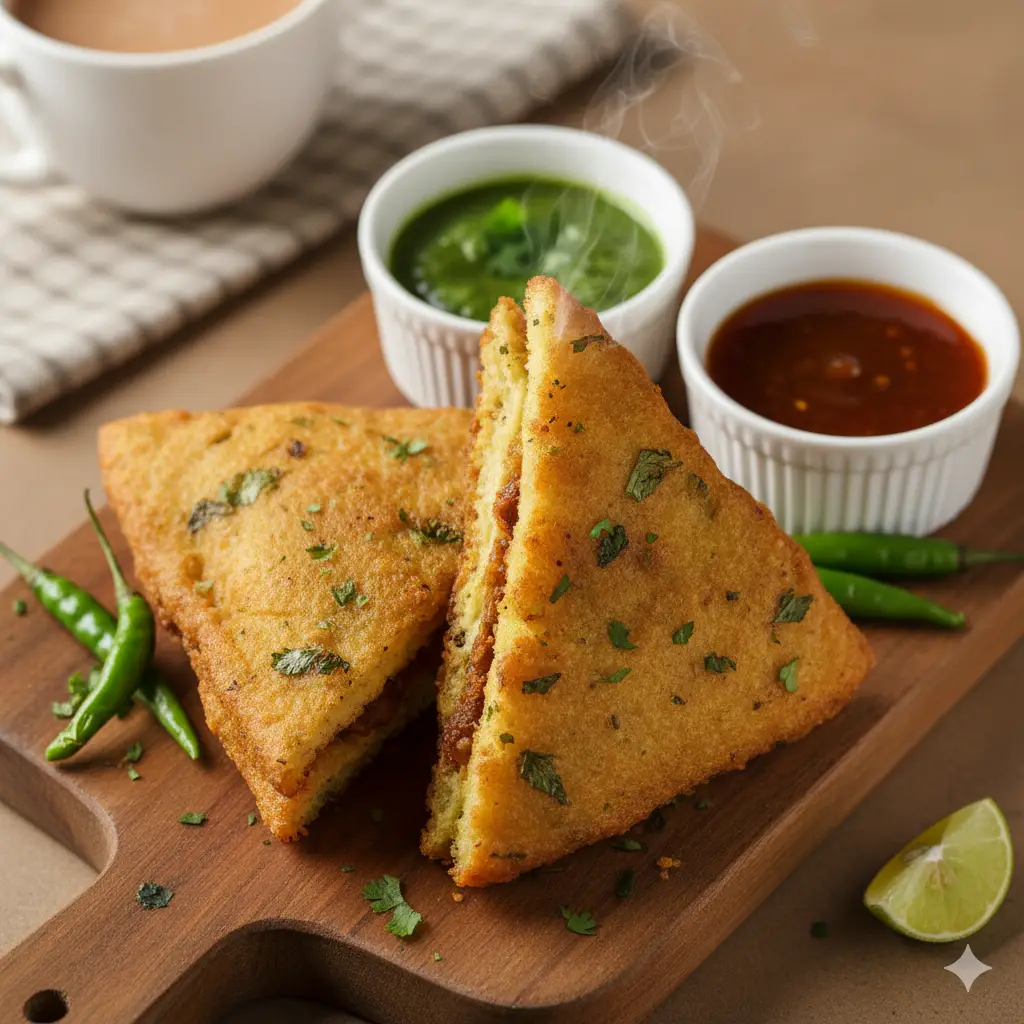
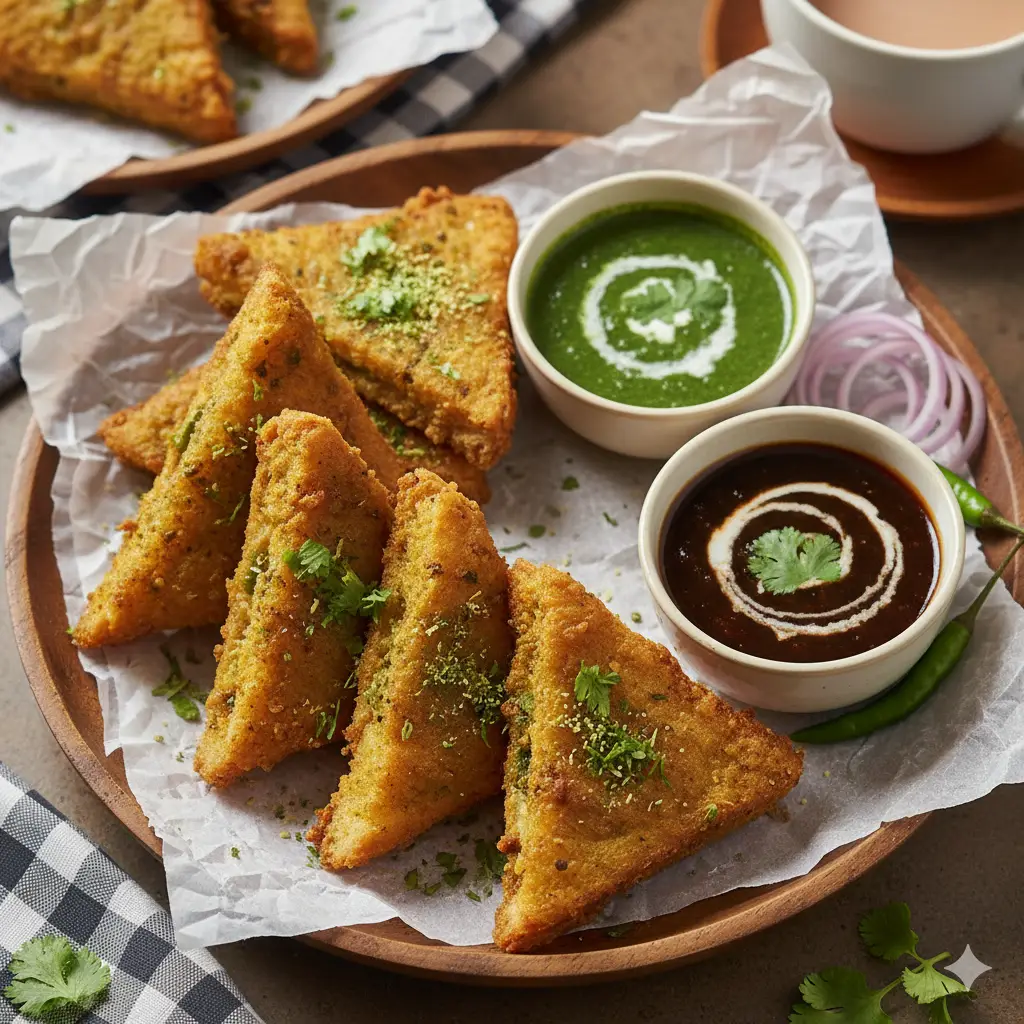
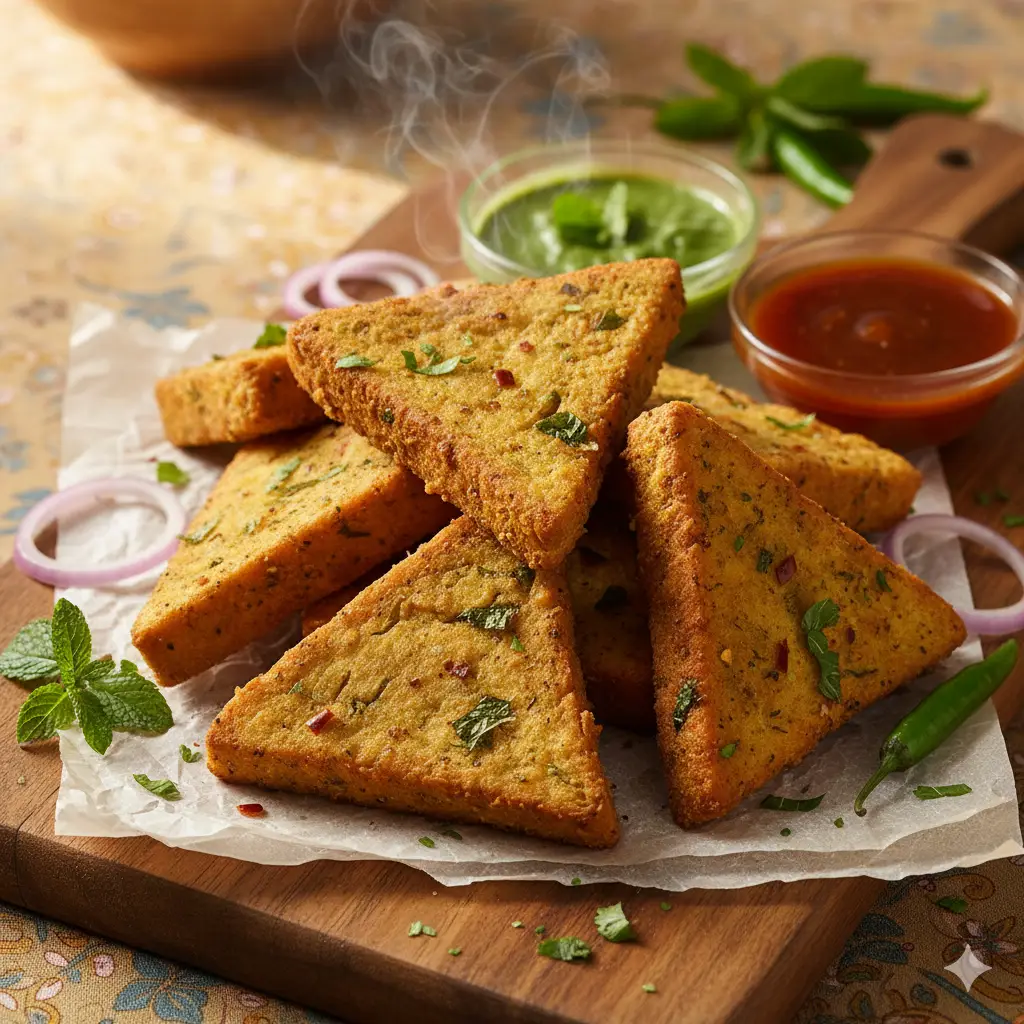
Bread pakora ## **Bread Pakora Recipe** ### **Description** Bread Pakora is a popular Indian snack made by stuffing bread slices (often with spiced potato filling), dipping them in gram flour (besan) batter, and deep-frying until golden and crisp. It is commonly enjoyed with chutney and hot tea. --- ## **Ingredients** ### **For the Stuffing (Optional but Traditional)** * Boiled potatoes – 3 medium (mashed) * Green chilies – 1–2 (finely chopped) * Ginger – 1 teaspoon (grated) * Green peas – 2 tablespoons (optional) * Coriander leaves – 2 tablespoons (chopped) * Cumin seeds – ½ teaspoon * Turmeric powder – ¼ teaspoon * Red chili powder – ½ teaspoon * Garam masala – ½ teaspoon * Amchur (dry mango powder) – ½ teaspoon * Salt – to taste * Oil – 1 teaspoon (for cooking stuffing) ### **For the Batter** * Gram flour (besan) – 1½ cups * Carom seeds (ajwain) – ½ teaspoon * Turmeric powder – ¼ teaspoon * Red chili powder – ½ teaspoon * Baking soda – a pinch (optional) * Salt – to taste * Water – as required (to make thick batter) ### **For Pakora** * Bread slices – 6–8 (white or brown bread) * Oil – for deep frying --- ## **Instructions** ### **Step 1: Prepare the Stuffing** 1. Heat 1 teaspoon oil in a pan on medium heat. 2. Add cumin seeds and let them crackle. 3. Add chopped green chilies and grated ginger; sauté briefly. 4. Add mashed potatoes, green peas, turmeric powder, red chili powder, garam masala, amchur, and salt. 5. Mix well and cook for 2–3 minutes. 6. Add chopped coriander leaves and turn off the heat. 7. Allow the stuffing to cool completely. --- ### **Step 2: Prepare the Batter** 1. In a mixing bowl, add gram flour, ajwain, turmeric powder, red chili powder, baking soda (if using), and salt. 2. Gradually add water and whisk to make a smooth, thick batter. 3. Ensure there are no lumps and the batter coats the back of a spoon well. --- ### **Step 3: Assemble the Bread Pakora** 1. Trim the edges of the bread slices if desired. 2. Place a spoonful of potato stuffing on one bread slice. 3. Cover with another bread slice and press gently. 4. Cut the bread sandwich diagonally or into halves (optional). --- ### **Step 4: Fry the Pakoras** 1. Heat oil in a deep pan on medium heat. 2. Dip each bread piece into the batter, ensuring it is fully coated. 3. Gently slide into hot oil. 4. Fry in batches until golden brown and crispy on all sides. 5. Remove and place on absorbent paper to remove excess oil. --- ## **Serving Suggestions** * Serve hot with mint chutney, tamarind chutney, or tomato ketchup. * Best enjoyed with hot tea or coffee, especially during rainy or winter weather. --- ## **Food Categories** Indian Snack, Street Food, Vegetarian, Deep-Fried Food, Tea-Time Snack --- ## **Meal Category (Time of Consumption)** Breakfast, Evening Snack, Brunch --- ## **Meal Type** Vegetarian, Fried, Comfort Food --- Read full recipe
Chhena poda ## Chhena Poda (Odisha’s Caramelized Cottage Cheese Dessert) ### Description **Chhena Poda** literally means *“roasted chhena”*. It is a traditional dessert from Odisha made by slow-baking fresh chhena (Indian cottage cheese) with sugar and flavorings until the sugar caramelizes, giving it a deep brown crust and rich flavor. It is often considered the only baked dessert of Odisha. --- ## Ingredients ### Main Ingredients * Fresh chhena (paneer made from cow’s milk) – **500 grams** * Sugar – **150–180 grams** (adjust to taste) * Semolina (suji) – **1 tablespoon** * Ghee – **1 tablespoon** * Cardamom powder – **½ teaspoon** * Cashew nuts – **10–12**, chopped * Raisins – **1 tablespoon** ### Optional Ingredients * Milk – **2–3 tablespoons** (if chhena is dry) * Bay leaf – **1** (for traditional aroma, optional) --- ## Instructions ### Step 1: Prepare the Chhena 1. Use **freshly made chhena** for best results. 2. Drain excess whey completely but keep the chhena slightly moist. 3. Crumble the chhena using your fingers or mash gently until it becomes soft and smooth, without lumps. ### Step 2: Mix the Ingredients 1. Add sugar to the mashed chhena. 2. Mix well until the sugar starts dissolving and the mixture becomes slightly creamy. 3. Add semolina, ghee, cardamom powder, cashews, and raisins. 4. If the mixture feels dry, add 2–3 tablespoons of milk. 5. Mix thoroughly to form a soft, uniform mixture. ### Step 3: Prepare the Baking Vessel 1. Grease a thick-bottomed baking pan or cake tin with ghee. 2. Optionally place a bay leaf at the bottom for aroma. 3. Transfer the chhena mixture into the pan and press it evenly. ### Step 4: Bake the Chhena Poda **Oven Method:** 1. Preheat oven to **180°C (356°F)**. 2. Bake for **45–60 minutes** until the top becomes deep golden brown and slightly cracked. 3. The caramelized crust is essential for authentic flavor. **Traditional Stove Method:** 1. Cover the pan and place it on a thick iron tawa. 2. Cook on very low flame for **1–1.5 hours**, flipping carefully halfway. 3. Slow cooking ensures proper caramelization. ### Step 5: Cooling and Serving 1. Remove from heat and allow it to cool completely. 2. Cut into slices only after cooling for clean edges. 3. Serve at room temperature. --- ## Food Categories **Dessert, Indian Sweet, Odia Cuisine, Baked Sweet, Festival Food** --- ## Meal Category (Time of Consumption) **Dessert, Evening Snack, Post-Meal Sweet** *(Not typically eaten as breakfast, lunch, or dinner)* --- ## Meal Type **Vegetarian, Sweet Dish, Milk-Based Dessert** --- Read full recipe
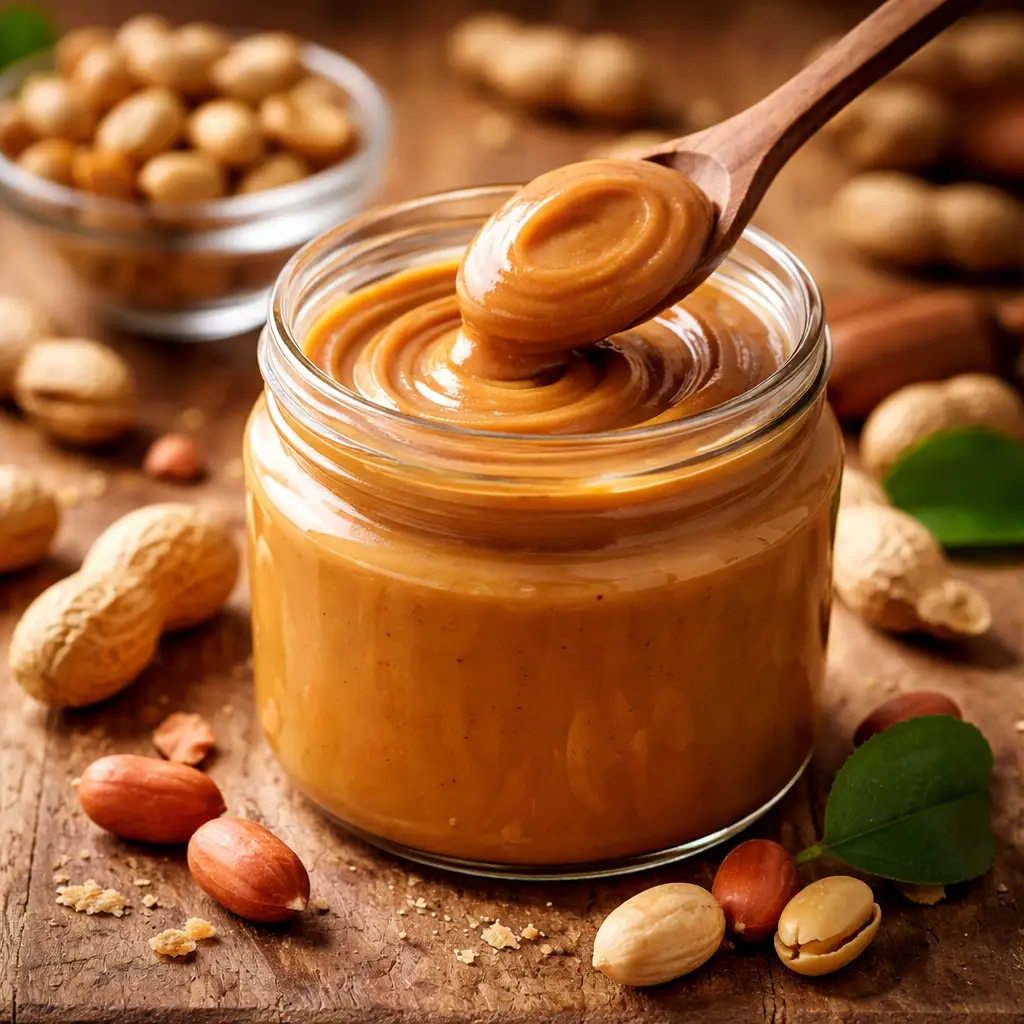
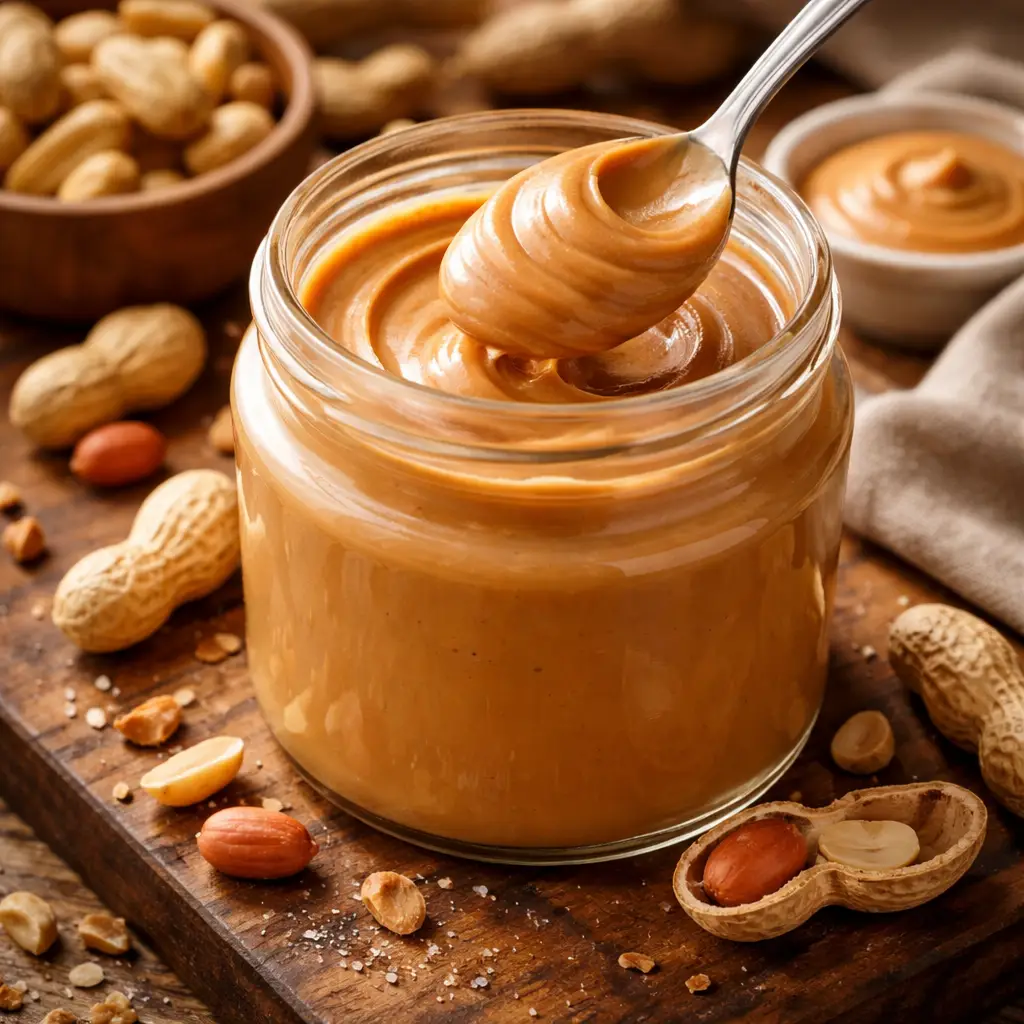
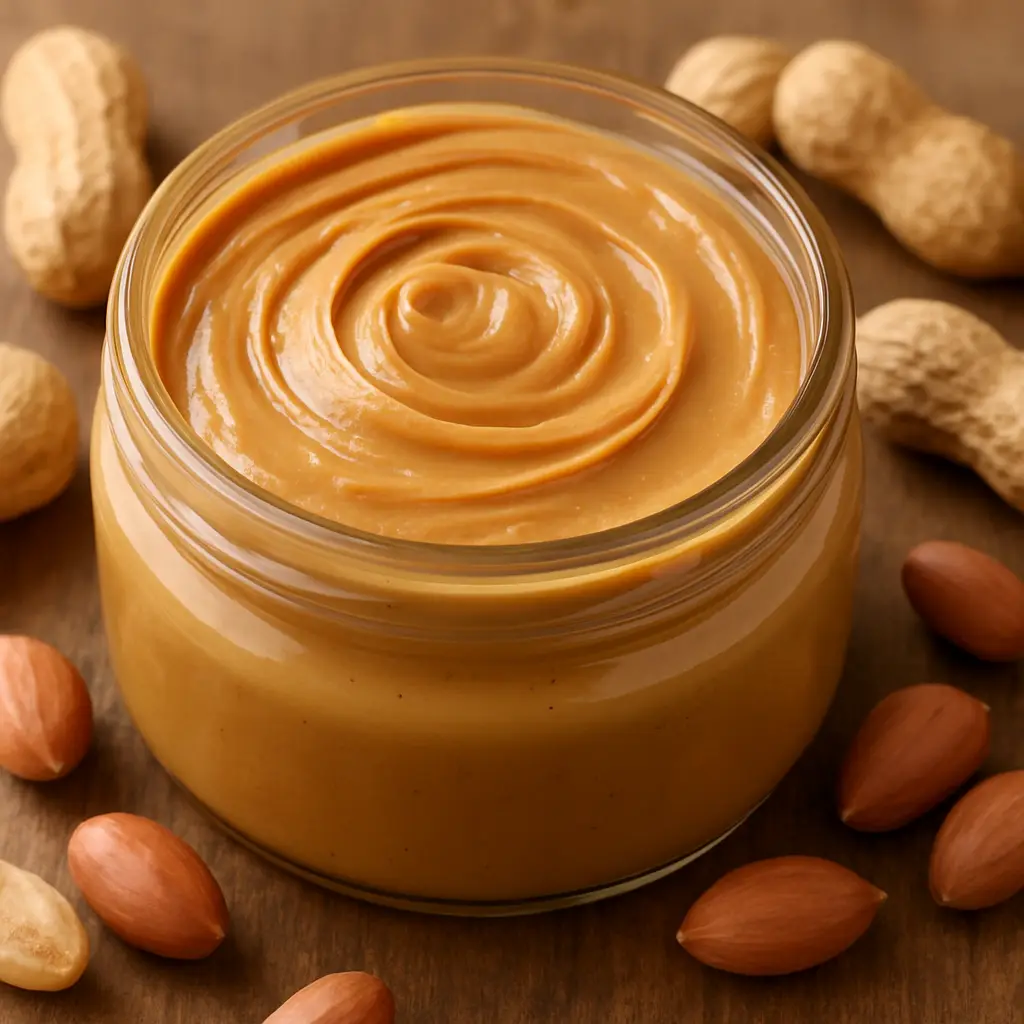
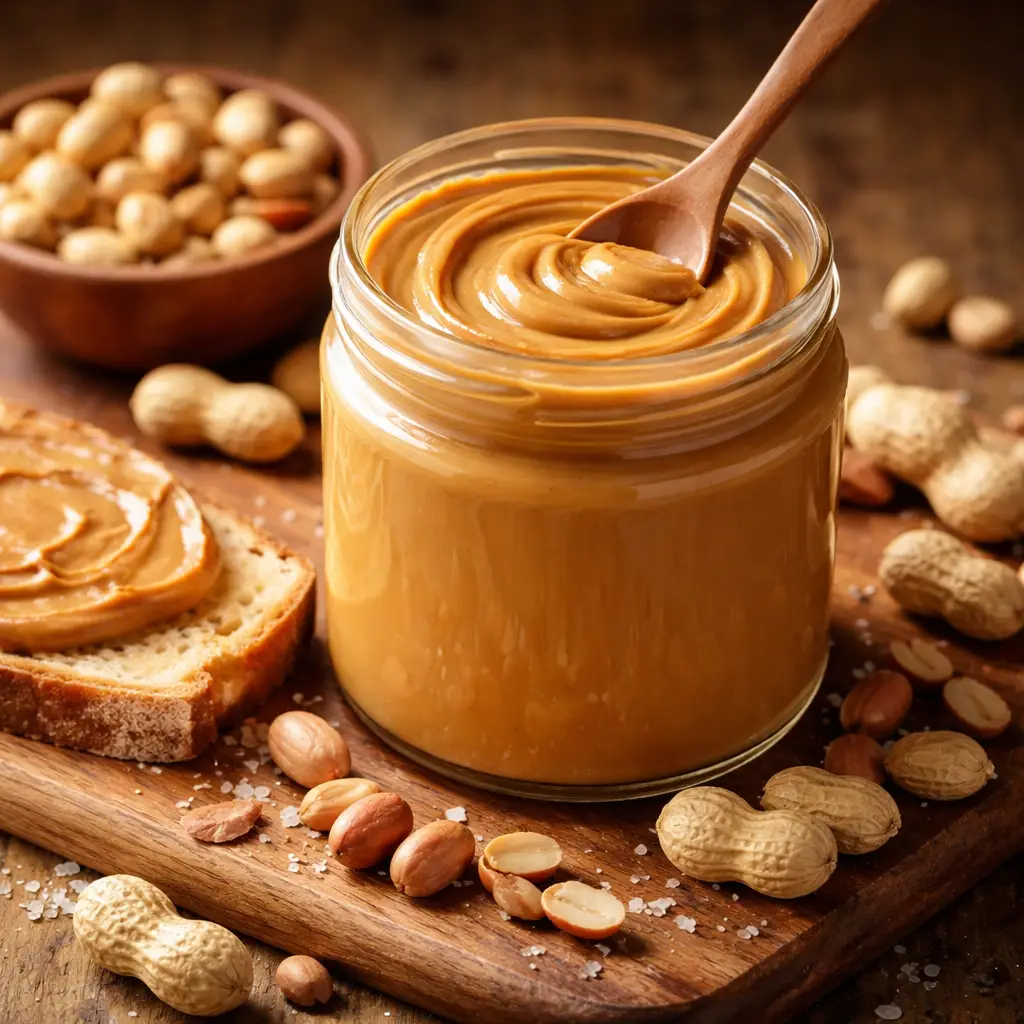
Peanut Butter ## Peanut Butter Recipe ### Ingredients * 2 cups raw peanuts (unsalted and shelled) * 1–2 tablespoons peanut oil or neutral oil (optional, for smoother texture) * ¼ teaspoon salt (optional, adjust to taste) * 1–2 teaspoons honey or sugar (optional, for sweetened peanut butter) --- ### Instructions 1. **Roast the Peanuts** * Preheat your oven to 180°C (350°F). * Spread the raw peanuts evenly on a baking tray. * Roast for 10–15 minutes, stirring once halfway, until peanuts are lightly golden and aromatic. * Remove from the oven and let them cool slightly. 2. **Remove Peanut Skins (Optional)** * Rub the warm peanuts between your hands or in a clean kitchen towel. * Shake off and discard the loose skins for a smoother peanut butter. 3. **Blend the Peanuts** * Place the roasted peanuts into a food processor or high-speed blender. * Blend for 2–3 minutes. The peanuts will first turn crumbly, then form a thick paste. 4. **Adjust Texture** * Continue blending until the peanut butter becomes smooth and creamy. * If needed, add peanut oil one tablespoon at a time to reach your desired consistency. 5. **Season and Sweeten** * Add salt and honey (if using). * Blend again for 30–60 seconds until everything is well combined. 6. **Store** * Transfer the peanut butter to a clean, airtight jar. * Store at room temperature for up to 1 week or refrigerate for up to 1 month. * Stir before use if natural oil separation occurs. --- ### Food Categories Spread, Nut Butter, Vegan, Vegetarian, Gluten-Free, Dairy-Free, Plant-Based, Protein-Rich --- ### Meal Category Breakfast, Snack, Anytime Meal --- ### Meal Type Condiment, Spread --- Read full recipe
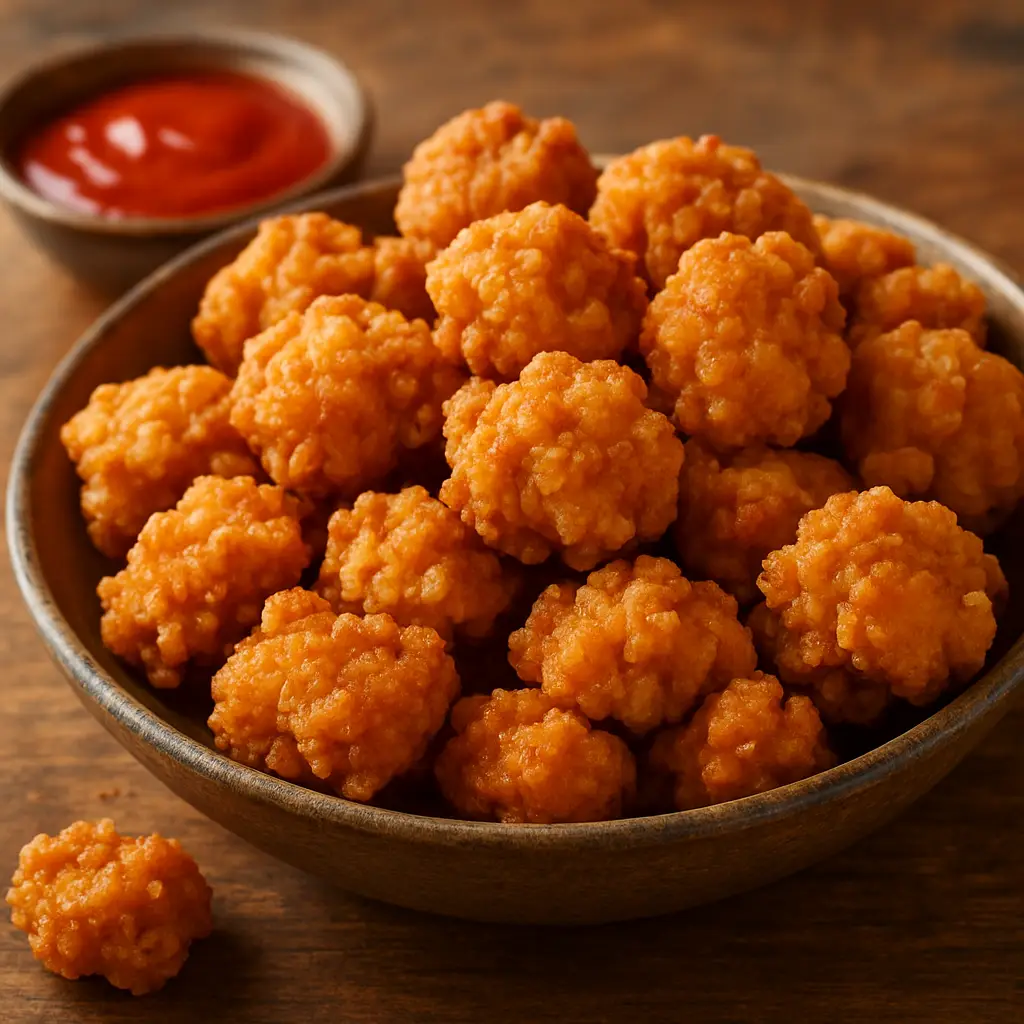
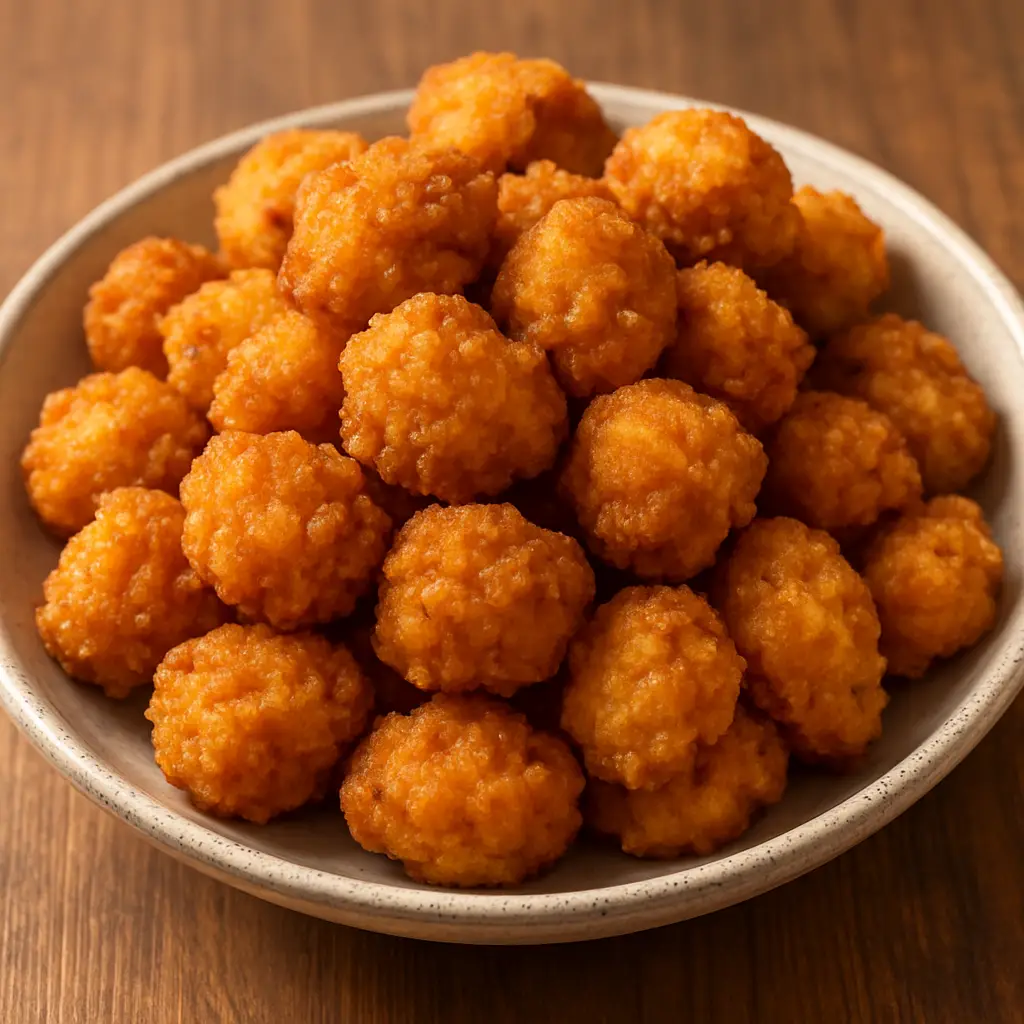
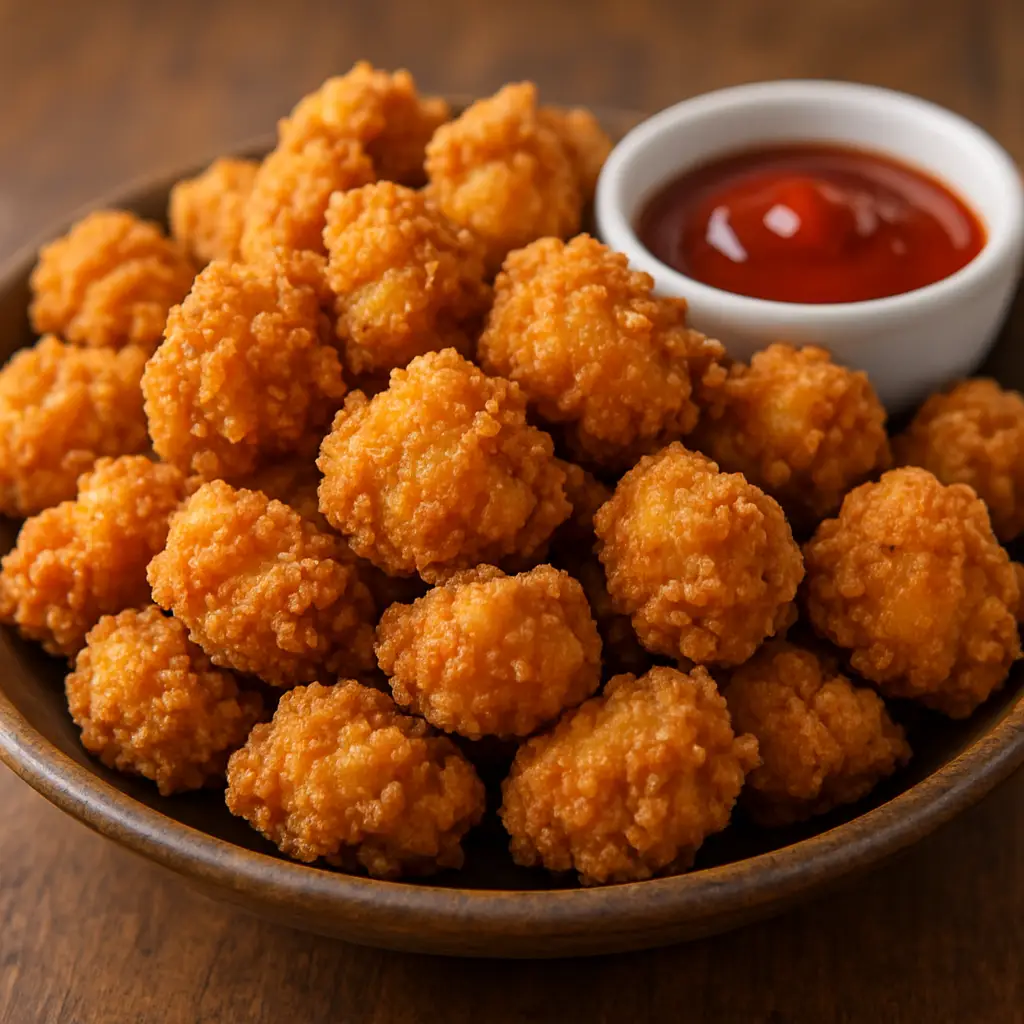
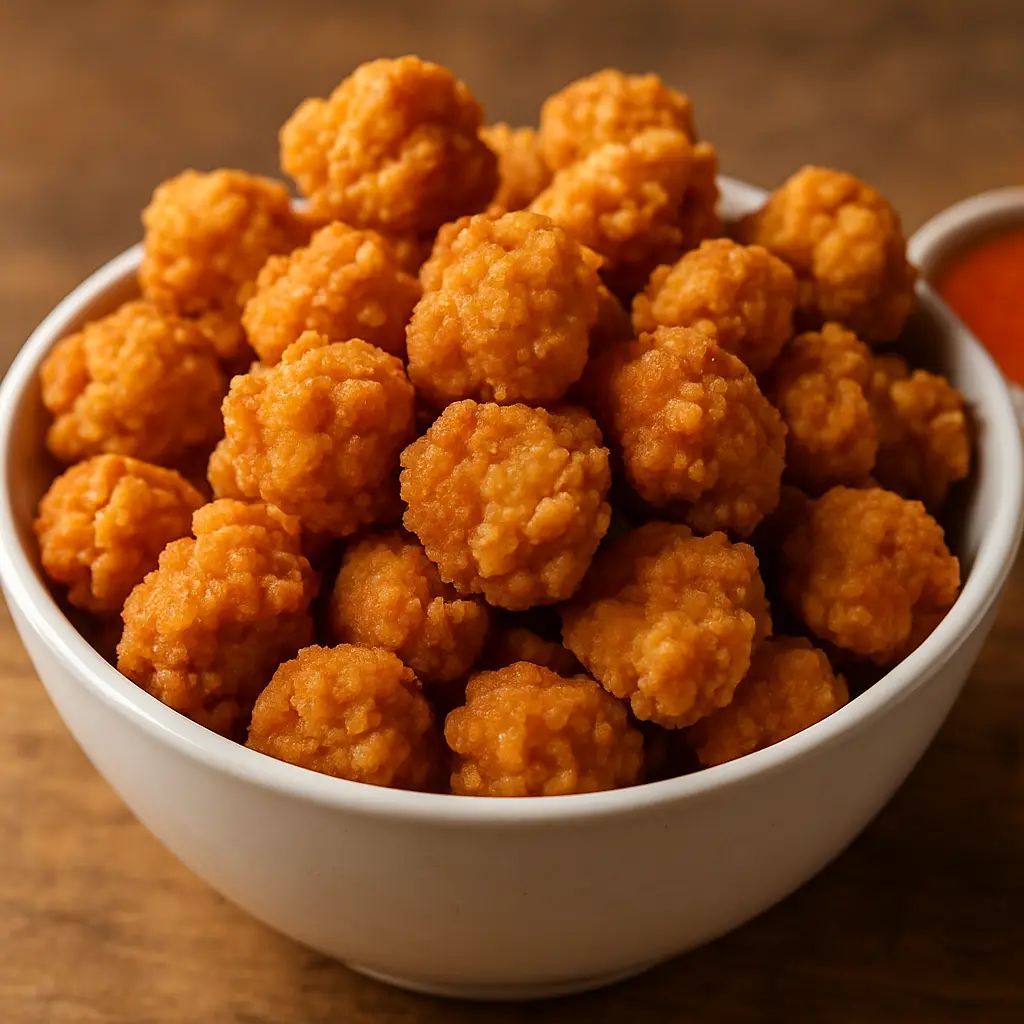
Crispy Chicken Popcorn ## Crispy Chicken Popcorn Recipe ### Description Crispy Chicken Popcorn is a bite-sized, crunchy chicken snack made with marinated boneless chicken pieces, coated in seasoned flour and deep-fried until golden brown. It is juicy on the inside and extra crispy on the outside, making it perfect as a snack, appetizer, or party food. --- ## Ingredients ### For Chicken Marinade * Boneless chicken – 500 grams (cut into small bite-sized cubes) * Ginger-garlic paste – 1 tablespoon * Black pepper powder – 1 teaspoon * Red chili powder – 1 teaspoon (adjust to taste) * Salt – to taste * Soy sauce – 1 tablespoon * Vinegar or lemon juice – 1 tablespoon * Egg – 1 (optional, for extra juiciness) * Cornflour – 2 tablespoons ### For Crispy Coating * All-purpose flour (maida) – 1 cup * Cornflour – ½ cup * Garlic powder – 1 teaspoon * Onion powder – 1 teaspoon * Paprika or chili powder – 1 teaspoon * Salt – to taste * Black pepper powder – ½ teaspoon * Baking powder – ½ teaspoon ### For Frying * Oil – for deep frying --- ## Instructions ### Step 1: Marinate the Chicken 1. In a large bowl, add chicken pieces. 2. Add ginger-garlic paste, black pepper, red chili powder, salt, soy sauce, vinegar (or lemon juice), egg (optional), and cornflour. 3. Mix well until all chicken pieces are evenly coated. 4. Cover and let it marinate for **at least 30 minutes** (for best flavor, marinate up to 2 hours in the refrigerator). --- ### Step 2: Prepare the Crispy Coating 1. In another bowl, combine all-purpose flour, cornflour, garlic powder, onion powder, paprika, salt, black pepper, and baking powder. 2. Mix well so the spices are evenly distributed. --- ### Step 3: Coat the Chicken 1. Take each marinated chicken piece and roll it in the flour mixture. 2. Press gently so the coating sticks properly. 3. For extra crispiness, double coat by dipping again in marinade and then in flour. --- ### Step 4: Fry the Chicken 1. Heat oil in a deep pan or fryer on medium heat. 2. Once oil is hot, carefully add chicken pieces in small batches. 3. Fry until golden brown and crispy, stirring occasionally. 4. Remove and place on paper towels to drain excess oil. --- ### Step 5: Serve * Serve hot with ketchup, garlic mayo, chili sauce, or honey mustard dip. * Garnish with chopped spring onions or parsley if desired. --- ## Food Categories Snack, Appetizer, Fast Food, Street Food, Party Food, Non-Vegetarian --- ## Meal Category (Time of Day) Evening Snack, Lunch Side Dish, Dinner Side Dish --- ## Meal Type Deep-Fried, High-Protein, Spicy, Crunchy, Finger Food --- Read full recipe
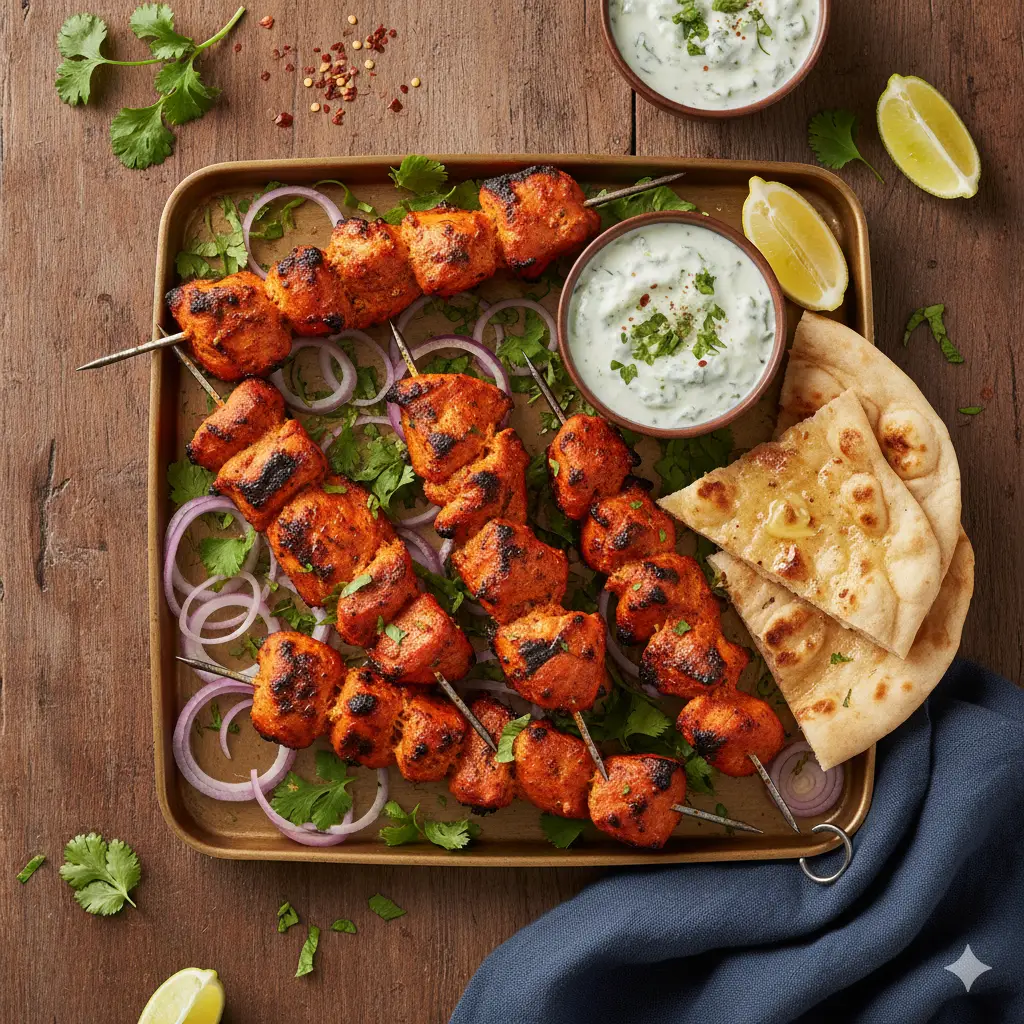
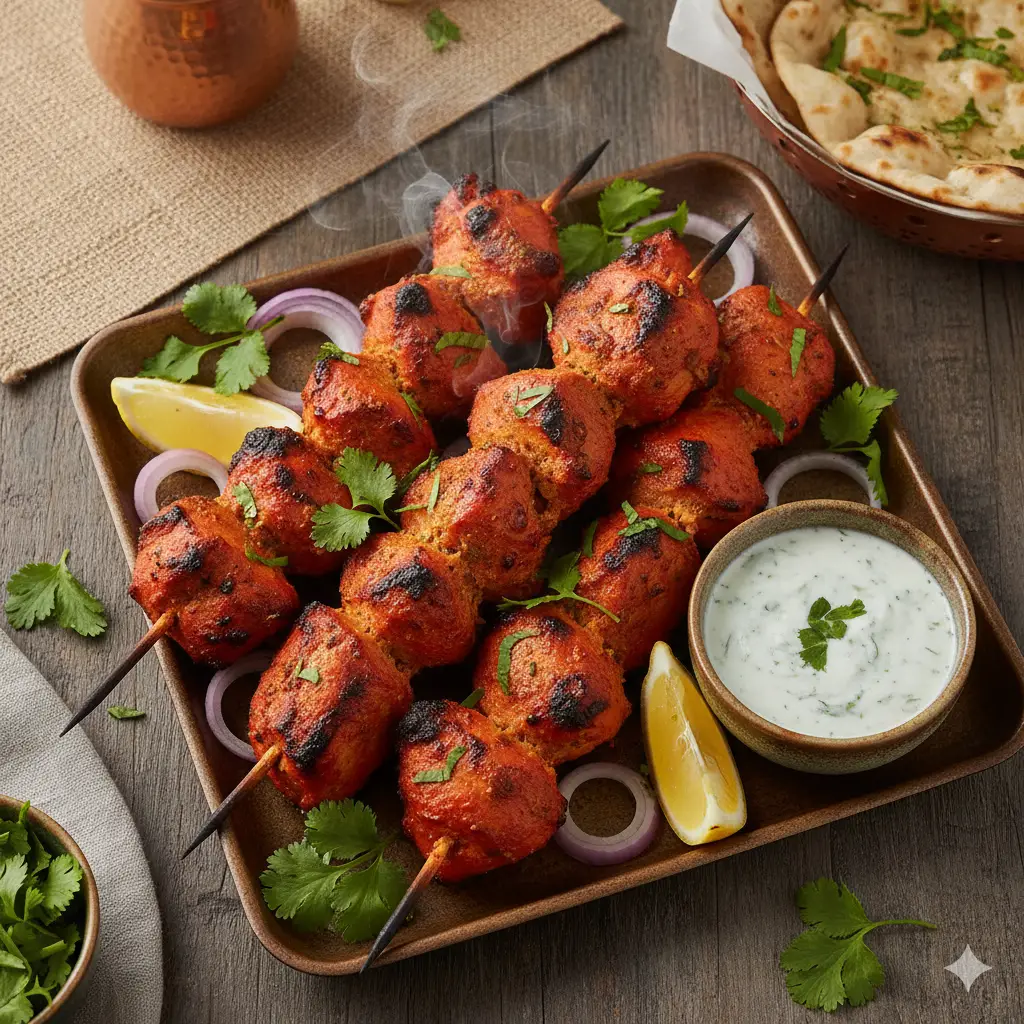
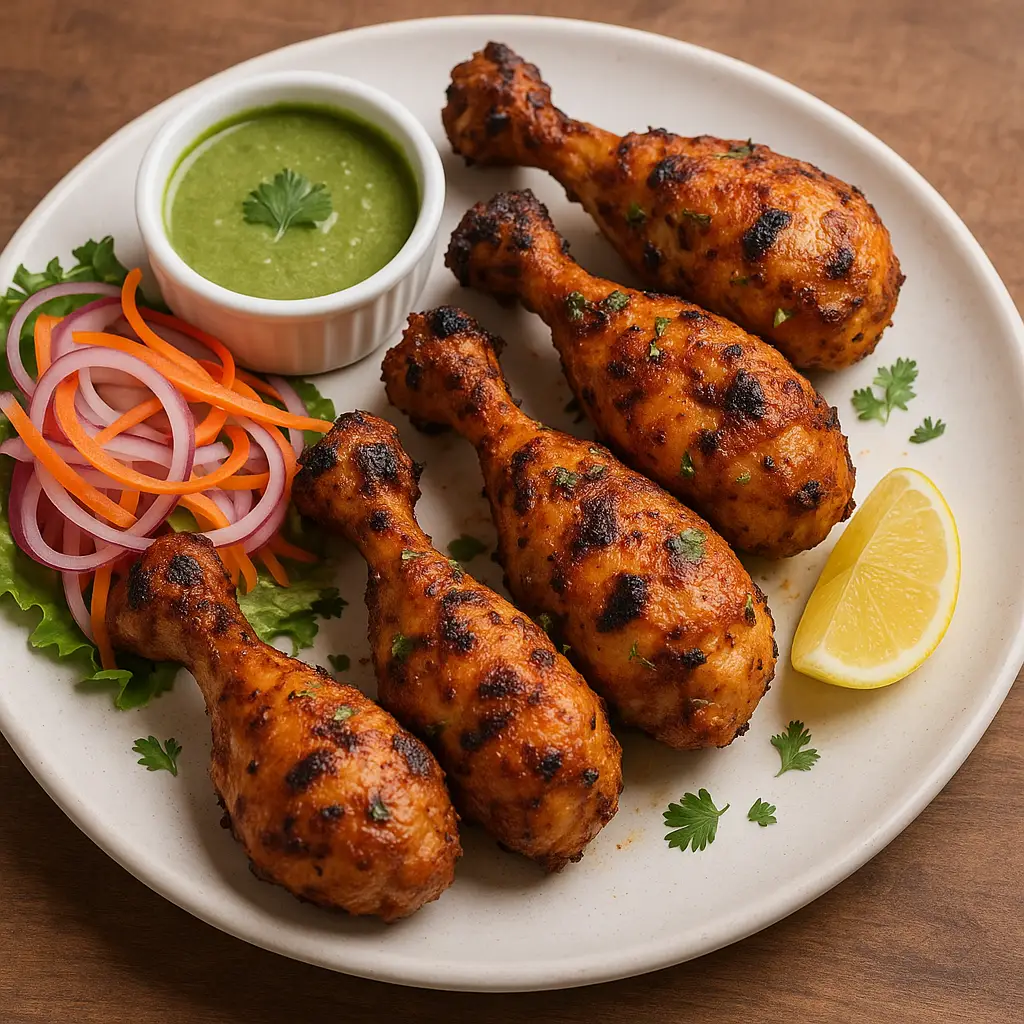
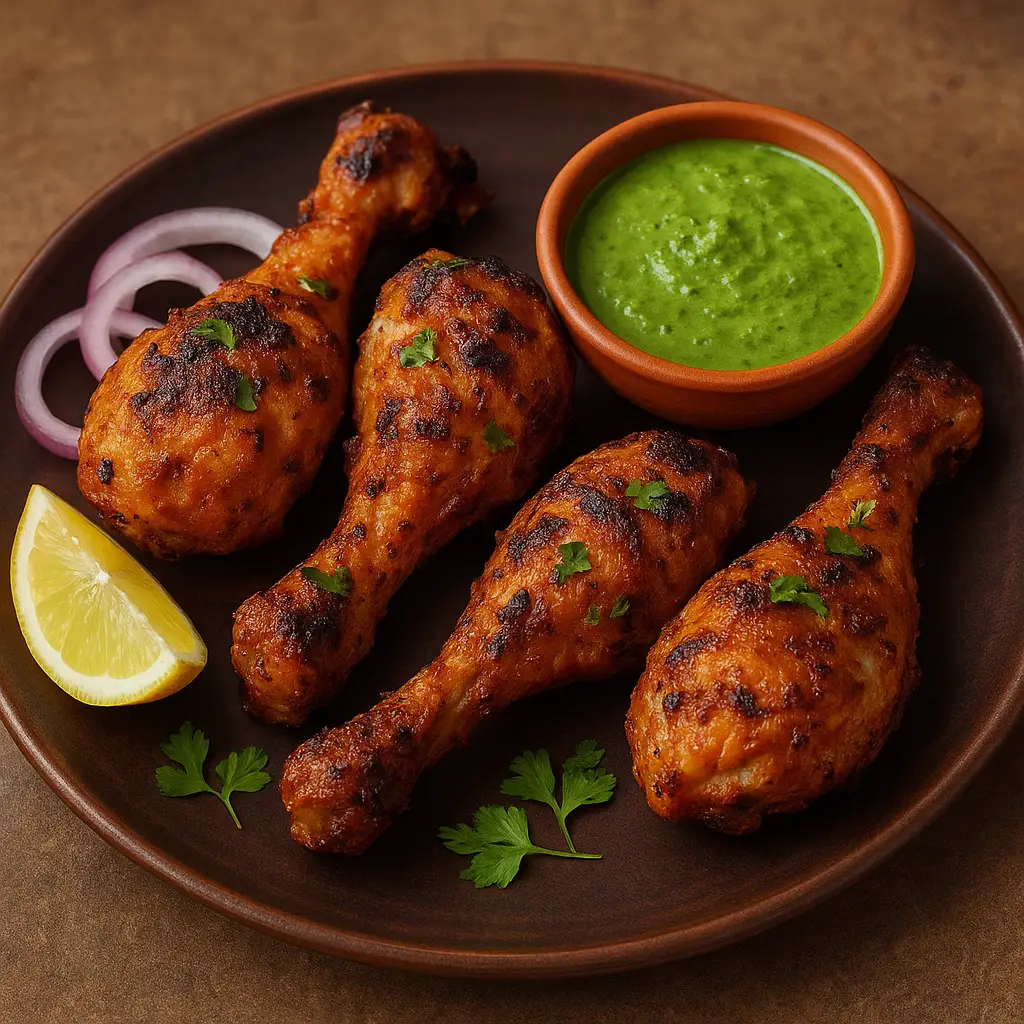
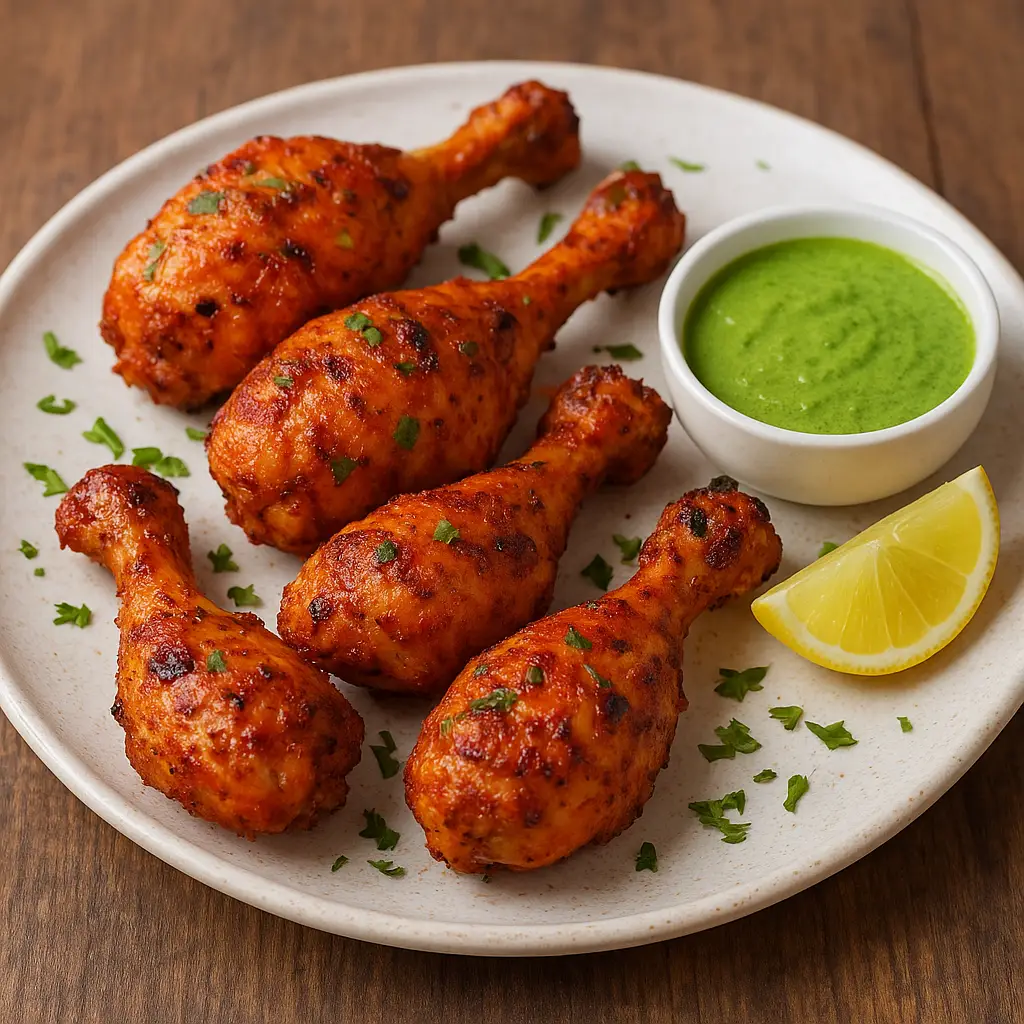
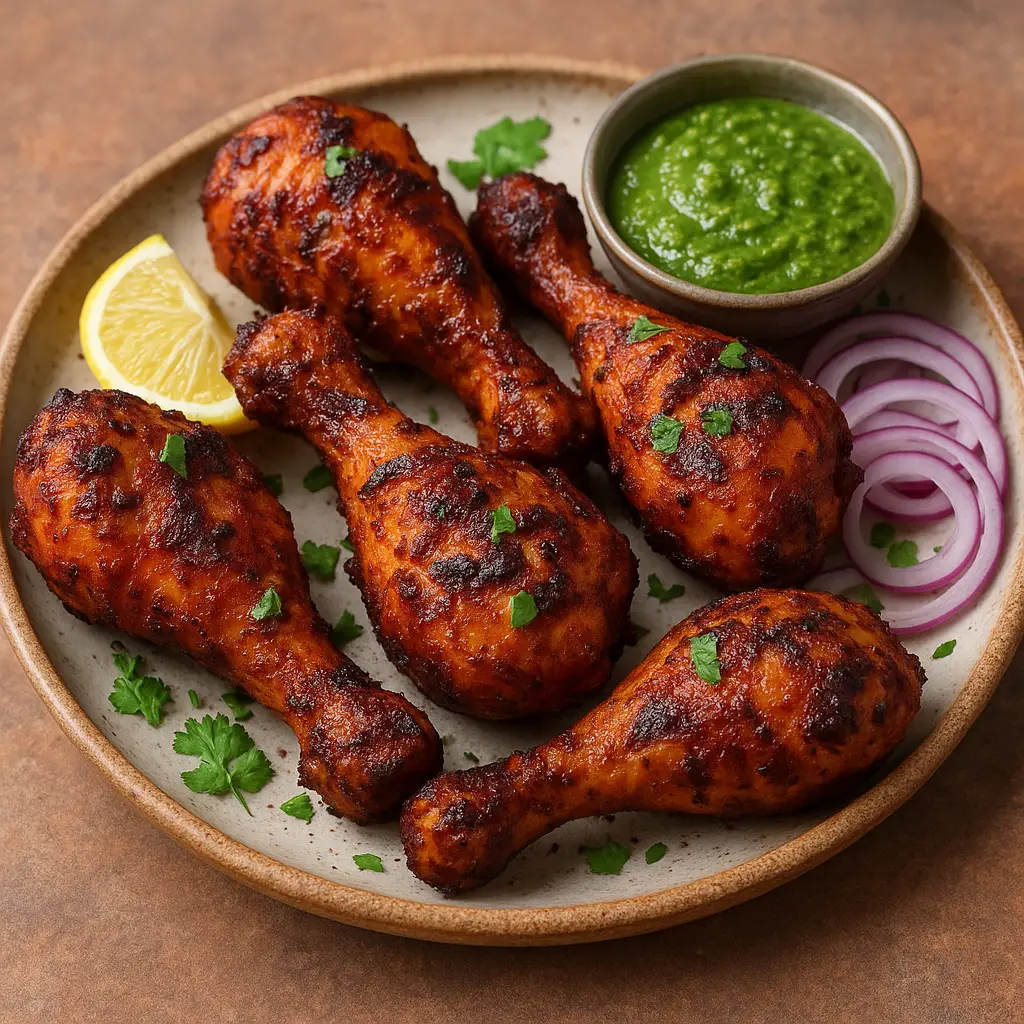
Chicken Tangdi Kebab ## Chicken Tangdi Kebab Recipe ### Description Chicken Tangdi Kebab is a popular Indian appetizer made from juicy chicken drumsticks marinated in a flavorful blend of yogurt, spices, herbs, and lemon juice, then grilled or baked until smoky, tender, and slightly charred. “Tangdi” means leg piece, and this dish is a staple at Indian barbecues and restaurants. --- ## Ingredients ### For Cleaning the Chicken * Chicken drumsticks (tangdi) – 6 pieces * Water – as required * Lemon juice or vinegar – 1 tablespoon * Salt – ½ teaspoon ### For First Marination * Lemon juice – 2 tablespoons * Ginger-garlic paste – 2 tablespoons * Salt – 1 teaspoon (or to taste) * Red chili powder – 1 teaspoon ### For Second Marination * Thick yogurt (hung curd) – ½ cup * Kashmiri red chili powder – 2 teaspoons (for color and mild heat) * Turmeric powder – ½ teaspoon * Garam masala – 1 teaspoon * Coriander powder – 1 teaspoon * Cumin powder – 1 teaspoon * Black pepper powder – ½ teaspoon * Kasuri methi (dried fenugreek leaves), crushed – 1 teaspoon * Mustard oil – 2 tablespoons (authentic flavor) * Lemon juice – 1 tablespoon * Salt – as needed ### For Cooking * Oil or butter – for basting * Charcoal (optional, for smoky flavor) --- ## Instructions ### Step 1: Clean and Prepare the Chicken 1. Wash the chicken drumsticks thoroughly with water. 2. Rub them with lemon juice or vinegar and salt, then rinse again. 3. Pat dry completely using a kitchen towel. 4. Make 2–3 deep cuts on each drumstick to allow the marinade to penetrate well. --- ### Step 2: First Marination 1. In a bowl, combine lemon juice, ginger-garlic paste, red chili powder, and salt. 2. Apply this mixture evenly to the chicken, ensuring it goes into the cuts. 3. Cover and rest for **20–30 minutes**. --- ### Step 3: Second Marination 1. In a large bowl, whisk the yogurt until smooth. 2. Add all remaining spices, kasuri methi, mustard oil, lemon juice, and salt. 3. Mix well to form a thick, smooth marinade. 4. Add the chicken and coat each piece generously. 5. Cover and refrigerate for **at least 6–8 hours**, preferably overnight for best flavor. --- ### Step 4: Cooking the Chicken #### Oven Method 1. Preheat oven to **220°C (430°F)**. 2. Line a baking tray with foil and place a wire rack over it. 3. Arrange the chicken on the rack. 4. Bake for **30–35 minutes**, turning once and basting with oil or butter. 5. Broil for the last 5 minutes for charred edges. #### Grill or Tandoor Method 1. Preheat grill to medium-high heat. 2. Grill the chicken, turning occasionally, until cooked through and slightly charred. 3. Total grilling time: **25–30 minutes**. #### Pan or Air Fryer (Optional) * Air fry at **180°C (356°F)** for **18–22 minutes**, flipping halfway. --- ### Step 5: Optional Smoke (Dhungar Method) 1. Heat a small piece of charcoal until red hot. 2. Place it in a small bowl inside the cooked chicken tray. 3. Drizzle ghee over the charcoal and immediately cover the tray. 4. Let it smoke for **5 minutes**, then uncover. --- ## Serving Suggestions * Serve hot with mint chutney, onion rings, and lemon wedges. * Pairs well with naan, rumali roti, or as a starter before a main course. --- ## Food Categories Indian, North Indian, Mughlai, Non-Vegetarian, Chicken Recipes, Grilled Food, Barbecue, Tandoori Style --- ## Meal Category (Time of Day) Lunch, Dinner, Evening Snack, Party Food --- ## Meal Type Starter, Appetizer, Side Dish --- Read full recipe
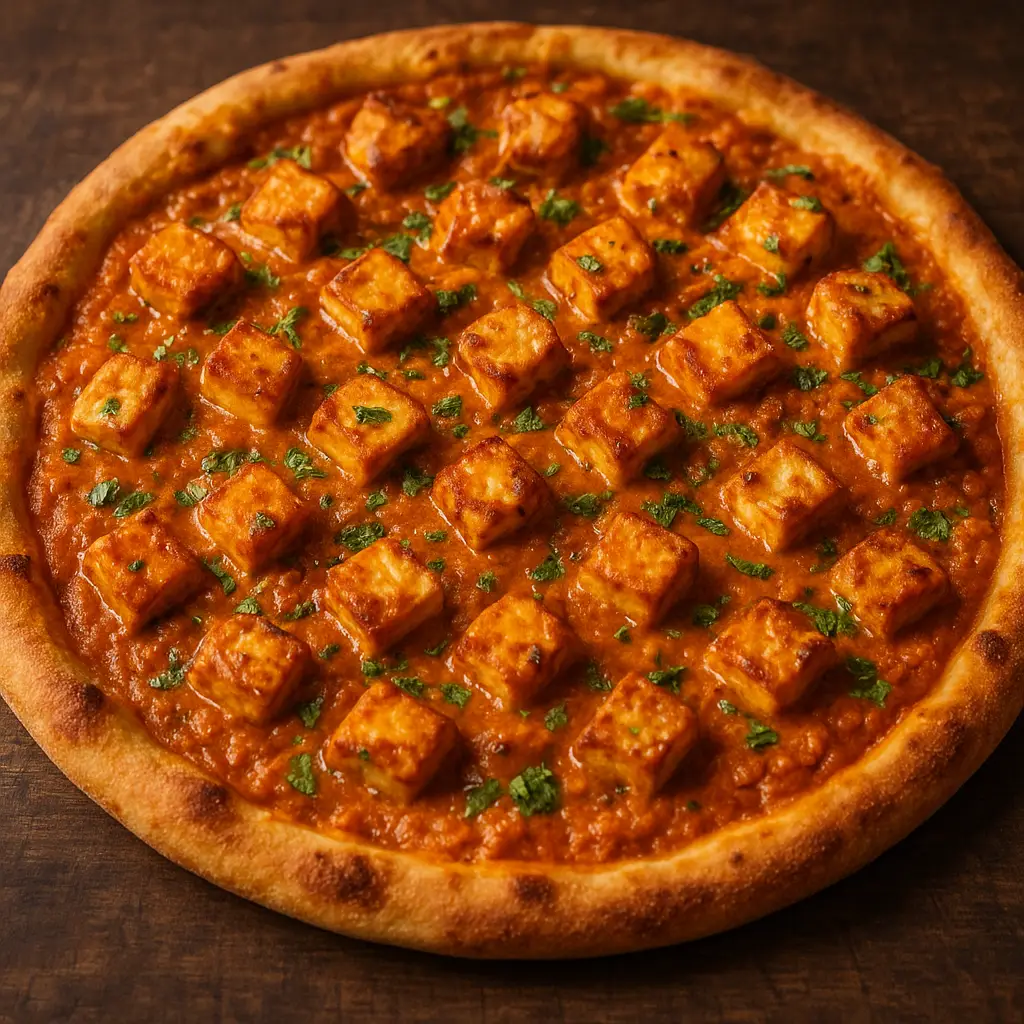
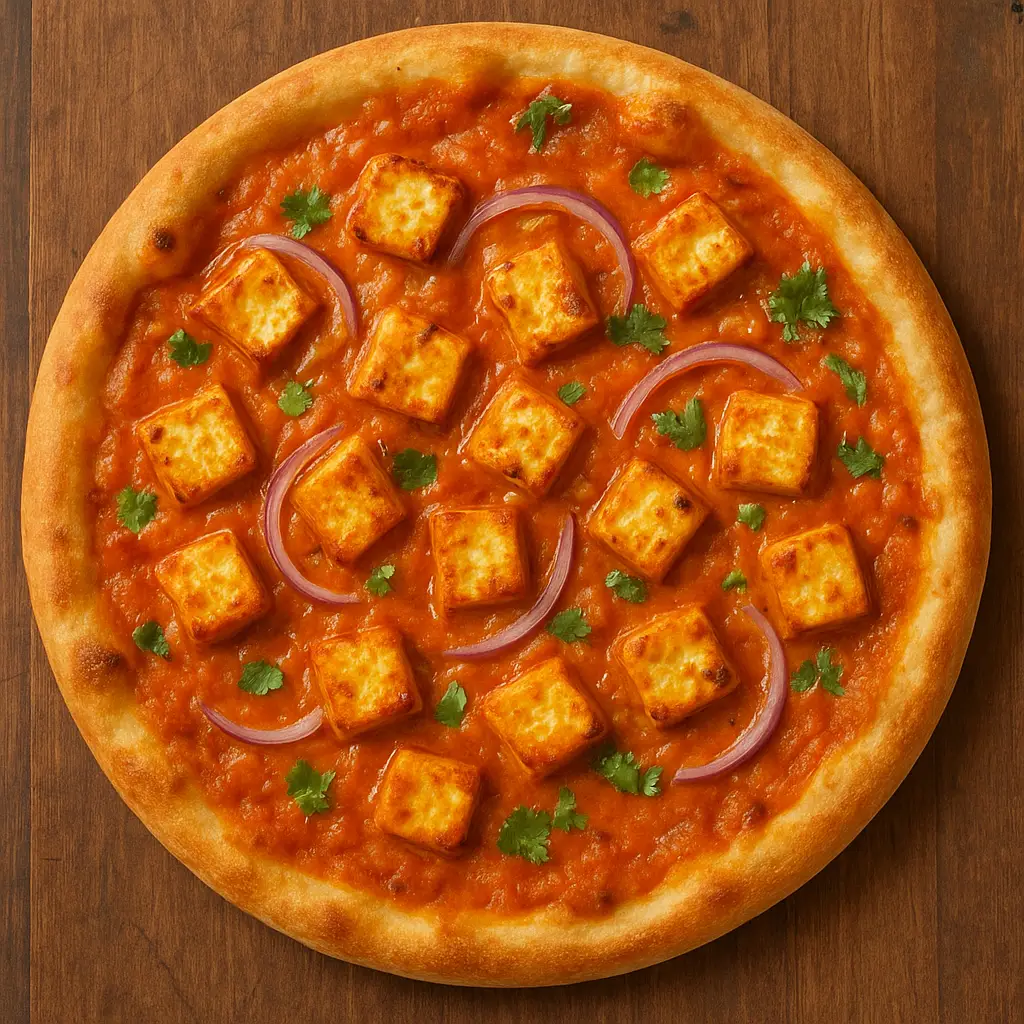
Paneer Makhani Pizza ## Paneer Makhani Pizza – Detailed Recipe ### Food Categories Indian Fusion, Vegetarian, Pizza, Italian–Indian Fusion, Baked Dish, Comfort Food ### Best Served As Lunch, Dinner, Evening Snack ### Meal Type Main Course --- ## Ingredients ### For the Pizza Base * All-purpose flour (maida) – 2 cups * Instant dry yeast – 1 teaspoon * Sugar – 1 teaspoon * Salt – 1 teaspoon * Warm water – ¾ cup (approx.) * Olive oil – 1 tablespoon *(You may also use a ready-made pizza base if preferred.)* --- ### For Paneer Makhani Topping * Paneer (Indian cottage cheese), cubed – 200 grams * Butter – 2 tablespoons * Oil – 1 tablespoon * Onion, finely chopped – 1 medium * Ginger-garlic paste – 1 teaspoon * Tomato purée – 1 cup * Cashew paste – 2 tablespoons (soaked cashews blended smooth) * Red chili powder – ½ teaspoon * Kashmiri red chili powder – 1 teaspoon (for color) * Garam masala – ½ teaspoon * Kasuri methi (dried fenugreek leaves), crushed – 1 teaspoon * Fresh cream – 3 tablespoons * Salt – to taste * Sugar or honey – ½ teaspoon (optional, for balance) --- ### For Pizza Assembly * Mozzarella cheese, grated – 1½ to 2 cups * Onion, thinly sliced – 1 small * Capsicum (bell pepper), thinly sliced – ½ cup * Sweet corn (optional) – ¼ cup * Dried oregano – 1 teaspoon * Chili flakes – ½ teaspoon * Butter – for brushing --- ## Instructions ### Step 1: Prepare the Pizza Dough 1. In a small bowl, mix warm water, sugar, and yeast. Let it rest for 5–10 minutes until frothy. 2. In a large bowl, add flour and salt. Mix well. 3. Add the yeast mixture and olive oil. Knead into a soft, smooth dough. 4. Cover and let the dough rise for 1 to 1½ hours, or until doubled in size. 5. Once risen, punch down the dough and roll it into a round pizza base of desired thickness. --- ### Step 2: Prepare Paneer Makhani Sauce 1. Heat butter and oil together in a pan on medium heat. 2. Add chopped onions and sauté until light golden. 3. Add ginger-garlic paste and cook until aromatic. 4. Stir in tomato purée and cook for 5–7 minutes until oil starts separating. 5. Add cashew paste, red chili powder, Kashmiri chili powder, salt, and sugar. Mix well. 6. Add paneer cubes and gently stir to coat them with the gravy. 7. Sprinkle garam masala and kasuri methi. 8. Add fresh cream, mix gently, and cook for another 2 minutes. 9. Turn off heat and allow the mixture to cool slightly. --- ### Step 3: Assemble the Pizza 1. Preheat oven to **220°C (430°F)** for at least 10 minutes. 2. Place the rolled pizza base on a greased baking tray or pizza stone. 3. Spread a generous layer of Paneer Makhani sauce evenly over the base. 4. Sprinkle half of the mozzarella cheese. 5. Add sliced onions, capsicum, sweet corn, and paneer cubes. 6. Top with remaining cheese. 7. Sprinkle oregano and chili flakes on top. --- ### Step 4: Bake the Pizza 1. Bake in the preheated oven for **12–15 minutes**, or until the cheese melts and the crust turns golden. 2. Once baked, brush the edges lightly with butter for extra flavor. 3. Remove from oven and let it rest for 2 minutes before slicing. --- ## Serving Suggestions * Serve hot with chili oil, garlic dip, or extra makhani sauce. * Pair with a fresh salad or cold beverage for a complete meal. --- Read full recipe